Showing posts with label baby. Show all posts

Friday, October 25, 2013

DIY Diaper Bag and Clutch


My sister in law Debbie is due with her first any day now. We are excited to hear of the arrival and find out if we have a new niece or nephew! Back when she was about 2 months pregnant she asked me to make a diaper bag...and I finished it last week (nothing like a little procrastination.)
She wanted a medium sized bag and yellow and gray fabric. I found the modern chevron fabric at Joann in the new HGTV line. And the lining is made out of a gray and cream quilting fabric, also from Joanns that I am unable to find a link for :( The bag pattern is The Poppins Bag with a couple changes: I added Peltex fusible interfacing to the exterior pieces and added an extra elasticized pocket on the interior. I left off the toddler handle and used all the same fabric for the exterior pieces and scrunch instead of coordinating prints.
The interior is filled with pockets as well as 4 large exterior pockets, which makes it easier to organize all your baby bag needs.

In addition, I made her a matching diaper clutch/changing pad using this TUTORIAL. I made a couple small changes. My clutch is a couple inches wider and I added a button and buttonhole closure instead of velcro.

Inside it holds diapers and wipes.

And opens out to a nice changing pad.

When you are done, just fold it back up and it fits nicely in the bottom of the bag. 

For as long as it took me to get going on this bag, it came together quickly and I am happy with the way it turned out. I hope she gets some great use out of it. 

Shannon

Wednesday, July 10, 2013

DIY Towel Pants - Mini Boden Knockoff


Earlier this spring I was flipping through the pages of the latest Mini Boden. I came across these adorable pants made of towelling material.


Here is my DIY Towel Pant version.


First, find yourself a cute towel. I picked up one last year from Walmart for about $5. I have seen so many cute ones out this year...but I am waiting for the clearance prices :) 


Next, find a loose fitting children's pants pattern or create your own from tracing a pair of your child's pants. For this DIY version I chose McCalls 5222. Next, carefully line up your pattern using one half of the towel. Do not fold the fabric in half and cut 2 fronts and 2 backs at once if you have a pattern that needs to line up. Instead, cut one front and one back piece on one half of the towel as shown below.


Then use those pieces to cut the 2nd piece. Simply flip them over onto the other uncut half of towel and line up your pattern. You can see how I matched my circles. I put some arrows on the photo below to help show this step. 


After cutting out your pattern, sew the pants following the instructions until the waistband. For the waistband, I decided to use a contrasting rib knit similar to the Mini Boden pants. I did not thread a drawstring through but may try that on a future pair for my son. 

Figure out how big your waistband needs to be. First, measure your child's waist. Then divide that measurement in half and determine how tall you want the waistband to be. I wanted mine to be about 2 inches tall. So, I cut 2 pieces of my ribbed knit 4.5 inches tall (because it will be folded in half and you need seam allowance to attach to the waist) by half the waist measurement. Make sure the greatest stretch is running across the width of the waistband. Next, take your two waistband pieces, place them right sides together and stitch/serge the two short ends. Press your seams. Turn right side out and fold in half encasing the raw edge. 


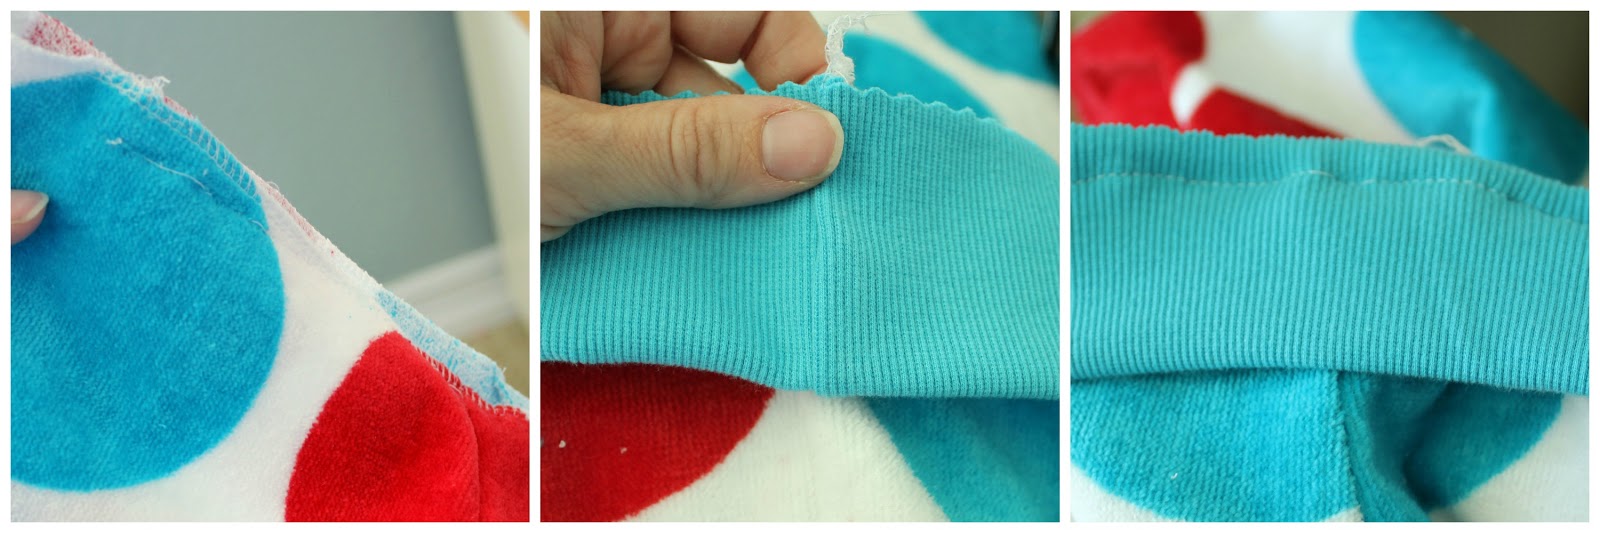
Now, take the top of the pants and line it up with the raw edge of the waistband, matching side seams. Make sure the raw edge is pointing up and the finished edge is pointing down towards the legs. Pin and baste the waistband on to the pants leaving an inch or two opening for elastic (in a later step). You will stretch the waistband as you go to make the two fit together. 

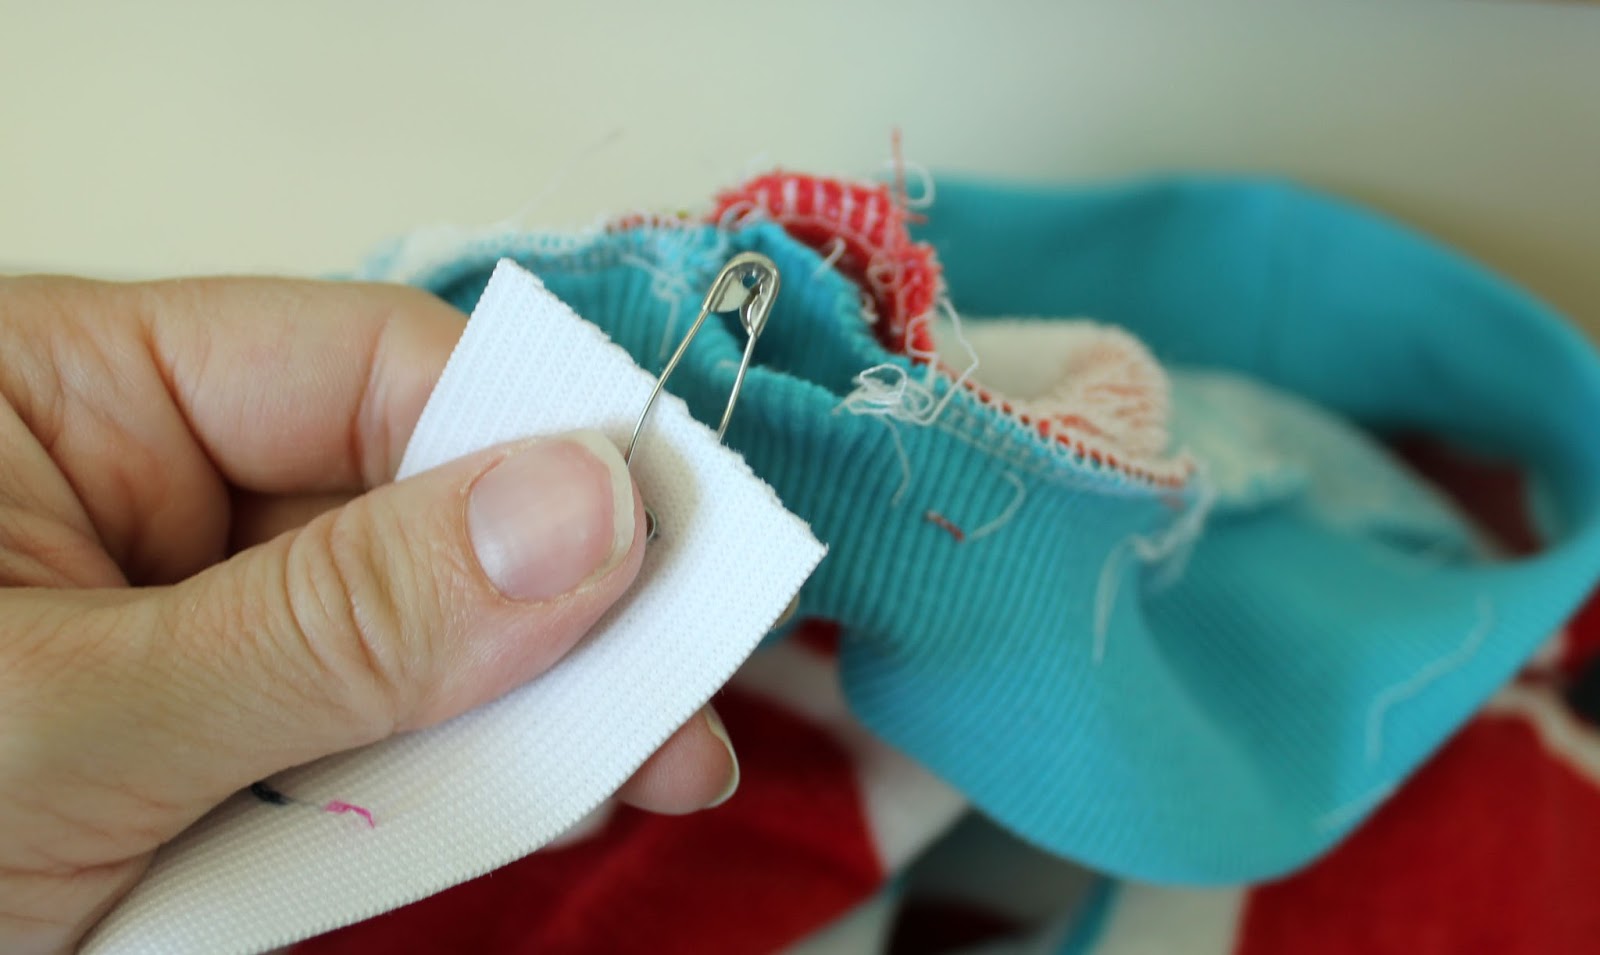
 **You can see in the photo sequence below that I did not realize the need for elastic until after my daughter tried them on, so it is out of order and I had to rip out my serged seams.** If I were to make them again I would add the elastic now through the opening. Use your child's waist to measure your elastic and thread through the opening with a safety pin.


After threading your elastic through, serge the basted waistband in place enclosing the opening. Make sure you do not catch the elastic in your serging stitch. And that's it. Enjoy your new towelling pants.

I have to say I kind of want to make an adult version to lounge around in...would that be weird??? Well, if I attempt it I will have to post them here :) Shannon


Tuesday, April 23, 2013

Meet...the smitten


It is the end of April, right? Because as of right now it is snowing outside. Last week we had 15 inches and now are being hit again with a milder storm. So, originally I was going to save this post for next fall when it may be more practical, but hey- winter is apparently not over in Colorado and so just in case it is the same where you live, check out the mitten/sock combo I like to call the smitten.


I wish I could say this idea was mine, but it was my husband's cousin's wife's idea...did you follow that? This summer we were talking about the annoyance of kids' gloves and how they get snow up their sleeve which makes them cold and whiny and she asked if I could sew socks on some mittens. I looked at her and thought- genius...why didn't I think of that. Then of course the name smitten...a glove you can love, came into my head...so one day, if you see these go BIG, you will know all my dreams came true. Well, not really, because I am about to tell you how you can make them. Enjoy.


First, you will need a pair of gloves or mittens (I bought these on clearance at Walmart for a $1 or $2, they also came with a hat). Then find a pair of children's socks that are close to knee length. I found a combo pack on clearance at Walmart as well. Grab some scissors, pins, and your machine. 


Cut off the foot portion of the sock. If you are some scrap busting master, I am sure you can find something to do with the foot portion. I tossed em...way too much stuff in this lady's craft room already!


Turn both the sock and the mitten inside out. Slide the sock over the mitten and pin. (This part is kind of hard to explain...I just wiggled the sock around until it was even with the bottom elastic edge of the mitten. You will have to reach your hand inside and fiddle with it a bit).


Set your machine to a wide zig-zag stitch.


You need to have a free arm machine so that you can release the base and have a narrower arm. Slide your sock onto the arm until you reach the point the sock and mitten meet. Begin stitching all the way around.
 
It is a tight fit and you can see above I am kind of having to push my fabric where I want it. Just go slow and keep adjusting the sock/mitten. Make sure your needle is DOWN in the fabric before you adjust the fabric.

Then snip the thread, and turn right side out- and that's it! My kiddos used them for the first time last week and they worked great...even better, my 2 year old couldn't take them off on his own so they stayed put until I wanted them off. Which is nice if you have a kid who constantly tries to take mittens off while out in the cold!


Shannon

Friday, November 30, 2012

Travel Chair Tutorial

We tend to travel with our family a few times a year. This time, before the holidays and next trip, I tried to get a head start on things that may make traveling easier. I came across this TUTORIAL for a travel high chair. In attempt to get my fabric stash down I brought out this vintage dog and cat print that I picked up at the thrift store awhile bag...there was a lot of it, so be prepared to see it again in a future post :) I also had a bit of leftover mustard fabric from a purse I made my sister over a year ago. It just happened to match perfectly. The only problem was the pattern called for quilted fabric. In an effort to use what I had, I decided to back the mustard fabric with batting and quilt it myself. Since I have no experience quilting I kept it simple. I simply drew a line down the center and then measured out 3 inch increments until I came close to the edge. I drew the lines in with chalk and sewed straight lines over them.

 In the next few shots you can see the error I made...I sewed the seat on the wrong side. Instead of sewing the connector piece to the short end, I accidentally attached it to the long end. This created a problem once you go to place a child in the seat. Luckily I saw the error before I traveled with the chair, removed the stitches and placed it on the correct side. It was a simple fix, but one that could have easily been avoided.
I think this project is simple and quick but to be honest...I am currently traveling and didn't pack it, so I can't tell you how great it works. Maybe if I remember to pack it next time around I can post an update. :)
Shannon

Saturday, November 10, 2012

She's Ready to Pop Shower

A couple weeks ago I had the great privilege to throw a baby shower for my friend and blogging partner, Betsy. Our friend Katie and I hosted and used the theme "She's Ready to Pop". While I didn't get great pics of the decor, hopefully you can get a feel for the shower. Links to recipes/crafts/ideas below. We set up 3 main areas for the shower: onesie craft, food, and seating/wish card station.
 Instead of playing games during the shower we decided to have everyone make Betsy a onesie. We set up an area in the sun room with stencils (we precut shapes on card stock), onesies in various sizes, short and long sleeve and different colors (we dyed several onesies using Rit), scissors, pencils, fabric backed with Wonder Under, and an iron. Katie made a sign for the table that coordinated with the invitations and food labels. I think you can tell from the pictures that everyone had fun (even people who said they weren't crafty) and it was great to see everyone's ideas come to life.  After the shower I took the onesies home to sew around the edges of the appliqué (by the way- thanks to those of you who added stuff to the front and back :) It actually didn't take long and hopefully will help all the beautiful designs stay on through washings.
For the food we stuck with the Pop theme and served Jalapeño Poppers, Mushroom Poppers, Zucchini Poppers, Oreo and Nutterbutter Truffle Pops (a big favorite- gotta try them!), Fluffy Punch with a Pop of Pink, Popcorn, candy tiers with pop rocks, tootsie pops and bubble gum, popcorn chicken, fruit pops and spinach salad with orange poppyseed dressing.


We also had an area for people to fill out wish cards for the baby and to pick up their favor...a POP of color. We simply tied orange ribbon around nail polish with a little sign that said pop of color.

 We also enjoyed some gift opening. Betsy's mom and grandmother had a neat idea I had not seen before. They took outfits they had saved from Betsy's childhood along with the photo taken of her in the outfit and presented them to her for her little girl. Her grandmother also made a lovely quilt that guests enjoyed looking at during the party.

The hostesses and the guest of honor. We had a great time and hope you know how much we enjoyed doing this for you Betsy.

Shannon

Sunday, September 16, 2012

Boomer "Baby" Sooner


Over Christmas break last year we were visiting family in Oklahoma when I happened to notice a donation pile in my brother and sister-in-law's house. I asked if they wouldn't mind if I looked through it first for potential items to refashion. I know...I am that weird lady who does this! One of the first items I saw was this OU sweatshirt in the first picture below.

I instantly knew I wanted to make it into a zip up sweatshirt for my son. My husband and four of his five brothers all went to OU. So...football season is big in our house and I wanted to get a sweatshirt for my little baby Boomer.  **Because this needed to fit next fall, I made it a little roomy for growth.**

Here is how I created the sweatshirt:
First, cut the sweatshirt apart at the shoulder seams, arm seams, and up both side seams. Then, find a current Jacket or Sweatshirt that fits your child well for a template. I took the jacket and tucked the arms into the bodice to create my back and front pattern pieces. I simply laid the jacket onto the sweatshirt and traced around the jacket template (adding a 1/2 inch to the pattern for seam allowances). While tracing the back I made sure I placed the O in the center of the back piece. I then traced the two front pieces.
Next, create an arm pattern piece by taking your jacket template arm and tracing it on the sweatshirt (again allow 1/2 inch seam allowances). Finally, I created a stand collar by simply tracing the template jacket's collar with added seam allowances. I cut out this piece twice for the collar.

Now you are ready to sew them together.

1. Take your back piece and lay it on the table right side up. Lay your two front pieces on top of the back, wrong sides facing up and match the shoulder seams.  Stitch the shoulder seams together using a 1/2 inch seam allowance.

2. Take your sleeve piece and mark the center top of the sleeve cap with a pin. Attach it to your front and back pieces matching the top center pin with the should seam. Pin the pieces right sides together and stitch all the way from one side of the arm piece to the other to attach the sleeve. **You could also attach the sleeve once the side seam is stitched by stitching the underarm seam of the sleeve and pinningthe sleeve into the arm hole. I just find this method to be quicker.**

3. Pin the sweatshirt right sides together, from the sleeve cuff all the way down the arm and continue down the body side seam. Stitch following your pins.
4. You should now have a basic sweatshirt. You could finish it off with your choice of collar and front closure. For mine, I chose a standing collar and exposed zipper. First, I took my two collar pieces and pinned them right sides together. Stitch around the two short sides and the top of the collar. Then turn the pieces right sides out and press. Pin one layer of the collar to the neck of the sweatshirt, right sides together and stitch. Press under 1/4 an inch on the remaining piece of collar that is not stitched on and enclose the collar/neck seam. Hand stitch the collar to the inside of the neckline.
5. To add the binding to the bottom of the sweatshirt, I cut off the existing binding and realigned it with the bottom of my new baby sweatshirt. I pinned the seams together as I pinned it to the sweatshirt bodice in order to get them to line up. I then stitched the seams in the binding and finally, attached it to the sweatshirt using a straight stitch.
6. Find a separating zipper and iron the zipper flat. Pin the zipper to each front side of your jacket/sweatshirt. I used an exposed zipper so I simply attached it to the outside front of the sweatshirt by stitching it on using a zipper foot. I would have preferred to have my zipper go all the way up the sweatshirt from the bottom to the top of the stand collar, but it was not long enough. Therefore I had to stop below the collar and this made it look a little odd...but you work with what you have!
And admire your little cutie!

Whew, writing this tutorial was wordy and difficult. I am sure there are easier ways to construct this, but this is the way I did it, and as usual that means figuring it out as I go. If you have any questions, feel free to email me.
Shannon