Over Christmas break last year we were visiting family in Oklahoma when I happened to notice a donation pile in my brother and sister-in-law's house. I asked if they wouldn't mind if I looked through it first for potential items to refashion. I know...I am that weird lady who does this! One of the first items I saw was this OU sweatshirt in the first picture below.
I instantly knew I wanted to make it into a zip up sweatshirt for my son. My husband and four of his five brothers all went to OU. So...football season is big in our house and I wanted to get a sweatshirt for my little baby Boomer. **Because this needed to fit next fall, I made it a little roomy for growth.**
Here is how I created the sweatshirt:
First, cut the sweatshirt apart at the shoulder seams, arm seams, and up both side seams. Then, find a current Jacket or Sweatshirt that fits your child well for a template. I took the jacket and tucked the arms into the bodice to create my back and front pattern pieces. I simply laid the jacket onto the sweatshirt and traced around the jacket template (adding a 1/2 inch to the pattern for seam allowances). While tracing the back I made sure I placed the O in the center of the back piece. I then traced the two front pieces.
Next, create an arm pattern piece by taking your jacket template arm and tracing it on the sweatshirt (again allow 1/2 inch seam allowances). Finally, I created a stand collar by simply tracing the template jacket's collar with added seam allowances. I cut out this piece twice for the collar.
Now you are ready to sew them together.
1. Take your back piece and lay it on the table right side up. Lay your two front pieces on top of the back, wrong sides facing up and match the shoulder seams. Stitch the shoulder seams together using a 1/2 inch seam allowance.
2. Take your sleeve piece and mark the center top of the sleeve cap with a pin. Attach it to your front and back pieces matching the top center pin with the should seam. Pin the pieces right sides together and stitch all the way from one side of the arm piece to the other to attach the sleeve. **You could also attach the sleeve once the side seam is stitched by stitching the underarm seam of the sleeve and pinningthe sleeve into the arm hole. I just find this method to be quicker.**
3. Pin the sweatshirt right sides together, from the sleeve cuff all the way down the arm and continue down the body side seam. Stitch following your pins.

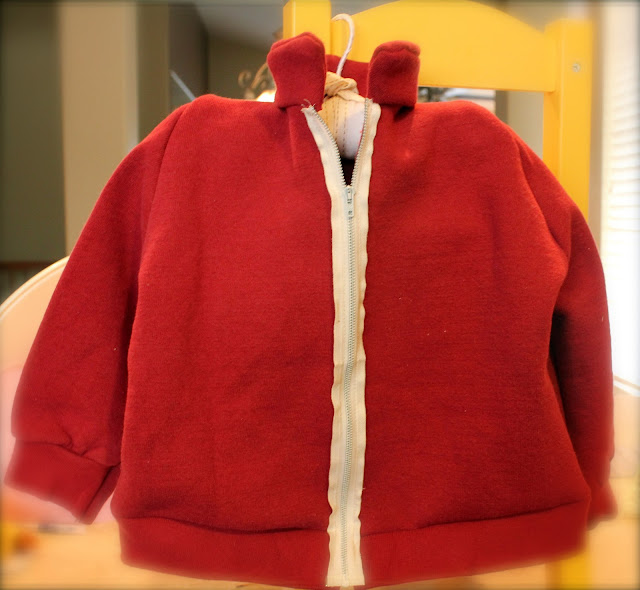
4. You should now have a basic sweatshirt. You could finish it off with your choice of collar and front closure. For mine, I chose a standing collar and exposed zipper. First, I took my two collar pieces and pinned them right sides together. Stitch around the two short sides and the top of the collar. Then turn the pieces right sides out and press. Pin one layer of the collar to the neck of the sweatshirt, right sides together and stitch. Press under 1/4 an inch on the remaining piece of collar that is not stitched on and enclose the collar/neck seam. Hand stitch the collar to the inside of the neckline.
5. To add the binding to the bottom of the sweatshirt, I cut off the existing binding and realigned it with the bottom of my new baby sweatshirt. I pinned the seams together as I pinned it to the sweatshirt bodice in order to get them to line up. I then stitched the seams in the binding and finally, attached it to the sweatshirt using a straight stitch.
6. Find a separating zipper and iron the zipper flat. Pin the zipper to each front side of your jacket/sweatshirt. I used an exposed zipper so I simply attached it to the outside front of the sweatshirt by stitching it on using a zipper foot. I would have preferred to have my zipper go all the way up the sweatshirt from the bottom to the top of the stand collar, but it was not long enough. Therefore I had to stop below the collar and this made it look a little odd...but you work with what you have!
And admire your little cutie!
Whew, writing this tutorial was wordy and difficult. I am sure there are easier ways to construct this, but this is the way I did it, and as usual that means figuring it out as I go. If you have any questions, feel free to email me.
Shannon


That is too cute!!! I love it :)
ReplyDelete-Ashley
http://distractedashley.blogspot.com
Oh my goodness. You have some serious sewing skills. I love that you took something destined to be donated and created something so stinkin adorable out of it for your son. I am really impressed.
ReplyDelete