Showing posts with label tutorial. Show all posts

Friday, October 25, 2013

DIY Diaper Bag and Clutch


My sister in law Debbie is due with her first any day now. We are excited to hear of the arrival and find out if we have a new niece or nephew! Back when she was about 2 months pregnant she asked me to make a diaper bag...and I finished it last week (nothing like a little procrastination.)
She wanted a medium sized bag and yellow and gray fabric. I found the modern chevron fabric at Joann in the new HGTV line. And the lining is made out of a gray and cream quilting fabric, also from Joanns that I am unable to find a link for :( The bag pattern is The Poppins Bag with a couple changes: I added Peltex fusible interfacing to the exterior pieces and added an extra elasticized pocket on the interior. I left off the toddler handle and used all the same fabric for the exterior pieces and scrunch instead of coordinating prints.
The interior is filled with pockets as well as 4 large exterior pockets, which makes it easier to organize all your baby bag needs.

In addition, I made her a matching diaper clutch/changing pad using this TUTORIAL. I made a couple small changes. My clutch is a couple inches wider and I added a button and buttonhole closure instead of velcro.

Inside it holds diapers and wipes.

And opens out to a nice changing pad.

When you are done, just fold it back up and it fits nicely in the bottom of the bag. 

For as long as it took me to get going on this bag, it came together quickly and I am happy with the way it turned out. I hope she gets some great use out of it. 

Shannon

Thursday, August 15, 2013

DIY Linen Bulletin Board with Nailhead Trim


I have finally been working on putting together my craft room. This room has come a long way and I have tried to do many of the projects on a tight budget. So, whenever I could use things I already had on hand, I tried my best to work with what I had. The bulletin board came from my daughter's room and had been unused for over a year. The "linen" fabric is actually a painter's drop cloth left over from my DIY Sectional cushions and we already had the stapler on hand. The only things I purchased for this project were the nailhead trim packages. I bought 2 online and one at Hancock fabrics. The cheapest route would probably have been to buy all at Hancock fabrics with coupons. That one package only cost me a $1.88. The problem was my store never got any of these back in stock. After making several trips, I just decided to buy it online. Unfortunately those ran more like $5 a piece...so all said and done, I spent about 12 bucks on this makeover.

To makeover the bulletin board it took a few simple steps. First, I laid the drop cloth on the floor and placed the bulletin board face down on top. I made sure there were a few inches of overhang on all sides and trimmed the fabric.


Then I started stapling the fabric onto the board. I pulled mine tight, but in hindsight I would probably not pull it quite so taut. It made adding the nailhead trim later much more difficult.

At the corners I pulled the fabric straight over the corner and tucked the two flaps down before stapling.


After stapling I trimmed the fabric...and got a little carried away- leave a little more than I did :)


Then I turned it over and added the silver 3/8 inch nailhead trim. I just pushed them right into the bulletin board, one inch apart, all the way around the board. 


You can see here some got a little wonky. I could easily pull them out and try it again. In the end, it looked like this: 


I am so pleased with the way this little corner is starting to turn out. I will also add some info about the desk and shelving we added to the space soon. It has come a long way from the way this room first looked....just wait for that before photo!


Shannon

Saturday, August 10, 2013

Strapless Maxi Dress Tutorial


Whew...I finally dug out of my craft room redo, prepping for a garage sale and staining leather furniture (more on that soon) to actually sew something. A couple days ago I decided to try making a strapless fitted maxi dress using two thrifted fabrics. I am pleased with the way this turned out. You can dress it up or down and the best part...it cost me about $5. This dress took me a little over 2 hours from start to finish, but that was while figuring things out, having a horrible battle with twisting elastic, and taking photos...so I am guessing you could complete it much faster than me if you give it a go. Would you like to make one? The tutorial is below. As always feel free to ask me questions at 2ndstorysewing at gmail dot com.

STRAPLESS MAXI TUTORIAL

1. Gather your supplies: About 4 yds total fabric. I used a 1/2 yd piece of thrifted fabric for the top. I am not totally sure what it is but it feels like some sort of polyster knit. It stretches but is a bit scratchy to the touch and I used a 3 yd piece of blue light weight knit (not totally sure on the exact kind) for the skirt and top lining. The skirt used extra yardage because it was cut on the bias. You will need a sewing machine, serger (optional), thread, scissors, and 1 1/4 inch elastic.

2. Begin by creating your top. You will need to take some measurements to create your pattern. First, measure under your armpits, all the way around your body. For me, this was 33 inches. Then measure around your lower ribcage, or where you want your top to end. For me, this was 29 inches. Now, divide both of those numbers in half, for me this was 16.5 and 14.5 to use on your pattern. Finally, measure from your armpit down to your ribcage, or where you want your top to end. For me, this was 10 inches.  Add one inch to this number for your pattern = 11 inches for me. Now sketch the following measurements on your fabric. (NOTE: You do not add seam allowance to the upper and lower measurements b/c you want it to be quite fitted.)
When I drew mine on my fabric, I did it as follows. First, I drew the 16.5 inch line across the top, then measured straight down 11 inches and marked on each side of the 16.5 inch line. From those marks, I measured in one inch on each side and marked (this was the marks for the start and stop of the 14.5 inch line since it was two inches smaller than my top line.) Then I used my ruler to connect the 16.5 inch line to the 14.5 inch line. The pictures show this below. 


Once you have your pattern drawn, flip the fabric on top of itself and cut out so you have two main fabric top pieces. Then place those pieces on your lining and cut 2 pieces.

3. Stitch and serge (or zig zag stitch) your two side seams on your main fabric. Place fabric right sides together and use a 1/2 inch seam allowance. Then repeat with the two lining pieces. 


4. Now it is time to put the lining and main top piece together. First, turn your main fabric right side out and have your lining fabric inside out. Now, slide your main fabric piece inside of your lining fabric until the meet at the top (the 16.5 inch side). Make sure your side seams line up and then stitch a 1/2 inch seam allowance all the way around the top, then serge. 


5. The first picture above shows what it should look like. You should have three edges sewn and the the bottom edge open. Now, open your fabric and press the seam towards the lining. 

6. Turn the fabric right side out and press again, making sure your lining is fully behind your main fabric. Then topstitch close to the top edge. After you top stitch, measure down 1.5 inches from the top of your fabric and make a line all the way around. This will be your stitching line for your elastic casing. Stitch on your marked line, leaving a two inch opening to insert your elastic. Next, take your 1 1/4 inch elastic and cut off the needed amount. I wrapped it under my armpits to determine the length. I wanted it snug but not so tight that it was uncomfortable. 

 7. Insert your elastic through your 2 inch opening using a safety pin. Feed the elastic all the way through your casing and overlap your two elastic ends. MAKE SURE YOUR ELASTIC IS NOT TWISTED...(enter the 30 minute fight I had with my elastic here)...Now, stitch your overlapped elastic ends using a zig zag stitch.  Now, go back and stitch the two inch opening closed. The center pic shows what this top should now look like. Now, onto the maxi skirt portion.

8. For this skirt I used a maxi skirt block that I already have. It originally came from Elle Apparel's website and since she now sells the pattern, I didn't want to put the pattern pieces on here. Here are a couple resources you could use to create your own or purchase a maxi skirt for this tutorial:
Elle Apparel's Maxi Skirt or U-create crafts Free Maxi skirt tutorial

I cut my skirt out on the bias for this dress. For info on cutting on the bias, see HERE. When I used my maxi block I originally thought I would have to add several inches at the waist for it to be tall enough. However, later in construction I realized this was way too small. So, disregard my photo showing the addition of 7 inches to the waist and instead only add 3 inches to the waist. Then I used chalk to match the new waist line to the side seam.

9. Once you have your skirt cut, stitch and serge the side seams using a 1/2 inch seam allowance. Take your open edge of your top and baste. Now it is time to insert the top into the bottom. Have the top right side out  with the top edge at the bottom and the skirt wrong side out. Slide the top inside the bottom, matching side seams. Slide it all the way in until the two straight edges meet. Pin and stitch using a 1/2 inch seam allowance.
 10. Turn right side out and press. Finally, hem the bottom of your dress. For this dress I tried this great tip from Mabey She Made It, for hemming a curved edge and it worked great. My knit was a little difficult to work with for this technique, but I would still use it again in the future. It made a beautiful clean hem with a little weight which is nice.


 And that's it. I hope you could follow these directions...it always sounds so much better and easier to follow in my head. But, if I was not clear, feel free to ask questions.


Pair with a jacket for a more relaxed look.
    Dress: DIY Denim Jacket: Polo (old), Necklace (from my latest Stitch Fix...love that service!)


Looks like a longer slip would be better...my fabric was a little sheer (oops).

Have a great weekend, Shannon



Thursday, July 25, 2013

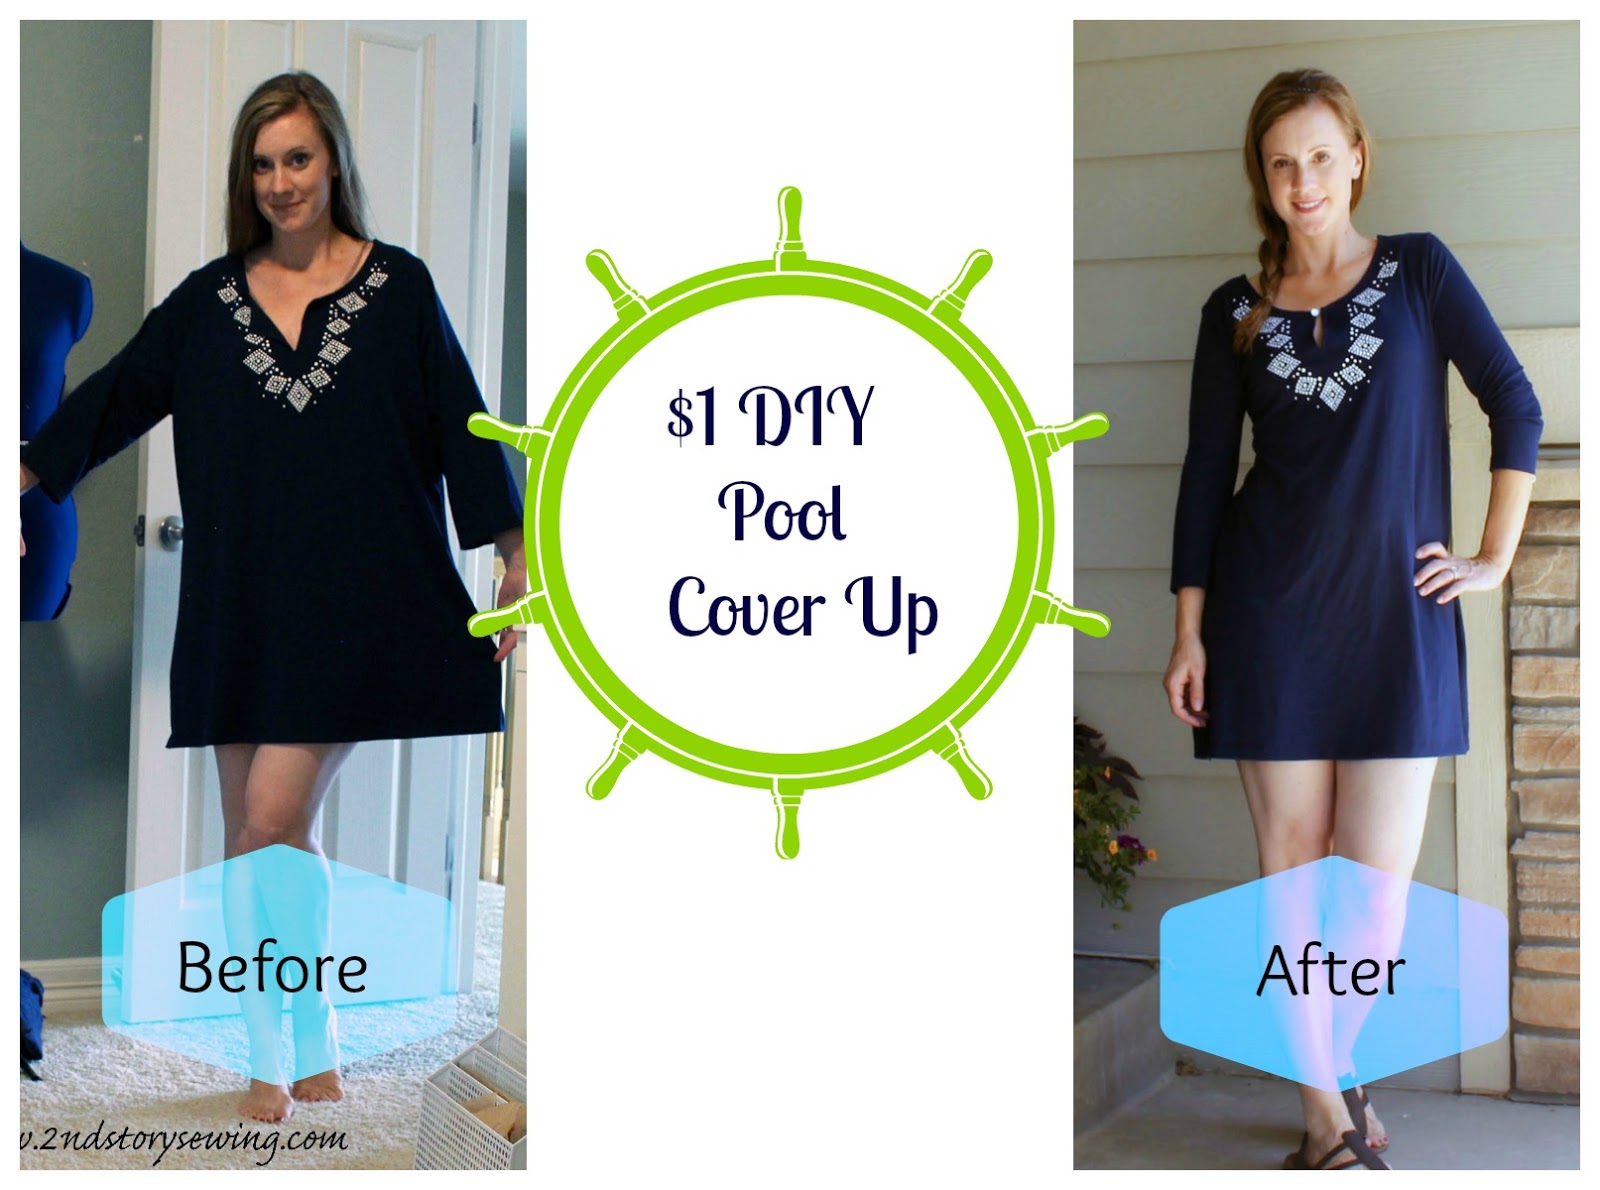
DIY $1 Pool Cover Up


I picked up this top from Walmart for $1.00 the other day. I thought for a buck it was worth trying to make it into an easy swim cover up. This cover up started as a 1X top. I took a dress (you may recognize this is my Yellow Boden Knockoff Dress) and used it as a guide for sizing.


After I turned the navy top inside out, I traced around my dress leaving a little extra room through the hips, tapering it out to the bottom (I ended up letting it out more at the bottom than the chalk lines show below). Using these tracing lines I stitched all the way from sleeve end to hem on both sides and tried it on for fit. I adjusted it slightly a couple times to get the fit the way I wanted.


Once I was happy with the fit, I serged the seam to finish it. Gave it a press with the iron and then moved on. The top had a v shape cut into it and it flopped open quite a bit. I decided to quickly stitch a small white button to one side and a loop of 1/8 inch elastic to the other side to create a quick button closure.


And...that was it. For $1 and about 20 minutes of my time, I have a quick and easy top for the pool...now, if only I went to the pool :)


Shannon

Thursday, July 18, 2013

Pretty Quick Peplum: DIY top in 30 minutes

Top: DIY Pattern below, Earrings: Clip Clip Hooray

Don't you love it when something actually works the way you want it to? (oops just noticed some uncut threads on my top in the photo- that didn't work the way I wanted it to :) I am happy to say this little top came out exactly how I hoped and it was so fast and easy too. I whipped up two tops the other day in about an hour and just had to share this easy and cute tutorial with you. I am not yet able to grade a pattern but I have included the one I used to make my top. It is similar to a size small in RTW, but I am sure it would be easy to make adjustments as needed. The pattern also has the color blocking variation included.


If you decide to print my pattern you will need 4 sheets of paper and some tape for piecing it together. **Make sure you do NOT overlap the pieces when taping them together, just butt them up next to one another.** You will want to make sure the pattern prints to the correct size, so you will see a 1 inch test square in the corner. This should measure one inch when printed. Match the letters on the paper (A to A, B to B, etc) until you have all your pieces taped together.

                                  PRETTY QUICK PEPLUM PATTERN

When cutting your pattern you will use the same piece to cut your front and back pieces of the top. In order to do this, first cut out your back piece. Then either cut off the back neckline portion of the paper pattern or use a tracing wheel to transfer the front neckline mark to your fabric while cutting your front piece. I prefer to use a tracing wheel so I can reuse the pattern without having to tape it back together.
                                                           (Sorry for the grainy photo)

COLOR BLOCK VARIATION: If using the color block portion, cut your bodice top (front and back) out of one color using the line marked (Color blocking Line) on the pattern.(This is my navy blue piece below) Add 1/2 inch below that line prior to cutting out your piece for seam allowance. Then cut from the color blocking line and below in another color. (my striped pieces below) Also add the 1/2 inch above the line before cutting. You can now sew those pieces together using a 1/2 inch seam allowance. The third picture shows how to lay out your pieces before sewing. Have your solid top piece right side up and turn your striped piece upside down with the right side down. Slide the striped piece down until they line up and stitch a 1/2 inch seam. I then serged my seam and pressed the whole seam to one side. Now, follow the rest of the tutorial from step 2 on.

Now, on to the tutorial:

Step 1. Choose a nice knit with adequate stretch. You want something that is similar to the weight and stretch of a t-shirt. Cut out one front and one back piece using the pattern (or using one of your own shirts traced off for a pattern). Lay the pattern on the fold of your fabric, making sure the stretch is running across the width of your pattern.

Step 2: Lay the front and back piece on top of each other, right sides together, matching shoulder seams.   Stitch across the shoulder seams using a 1/2 inch seam allowance. Serge/finish seam (optional) and press towards back.

Step 3: Stitch down both side seams using a 1/2 inch seam allowance from the armpit down. Serge/finish seam (optional) and press.


Step 4: Finish your sleeves and neckline. I tried three different techniques and you can use any of the following: Option 1: Press your neckline/sleeve in 1/4 inch and press, then press another 1/4 inch and stitch close to the folded edge. **Your stitching will probably look much nicer than mine below. I was too lazy to change my bobbin thread and this is what happens when you sew it from the right side of the shirt instead of using your hem (on the inside) as a guide!**

 Option 2: Serge the raw edge and press it under 1/4 inch, then stitch it down.


Or Option 3: (Also the most time consuming) Create bias trim from your knit fabric by cutting two strips 1 inch wide by 9 inches long (make sure the piece has stretch going the right direction b/c it will be stretched around the neckline as you sew). Sew the two short ends together to create a circle. Place the right side edge of your bias tape on the right side of your neckline and stitch a 1/4 inch seam all the way around. Make sure you stretch it slightly so that your side seams line up with your bias tape seams. Then fold the bias tape in towards your neckline's wrong side as shown in picture 3 and stitch again. (The red lines show where you should stitch). Then fold it under again towards the wrong side making sure the bias is completely hidden and stitch one last time. (The red lines show where to stitch). On the outside, the only stitching that shows is the last one you did. 

Step 5: Create your bottom hem. Again, you can do a quick hem by serging the raw edge, pressing it under and stitching or a more traditional hem. For the traditional hem, press your fabric 1 inch towards the wrong side and then another 1 inch towards the wrong side and stitch near the folded edge. (sorry I do not have photos of this step).

Step 6: Insert your elastic. Cut a piece of elastic for your natural waist. I used 1/4 inch elastic and cut mine 27 inches. Mark your elastic line (on the inside or wrong side of your shirt) by using the pattern as a guide and drawing a line across both the front and the back in a disappearing or water soluble marker. This line will be your guide as you sew on the elastic.

Now, pin your elastic to one side seam, find the center of the elastic and pin it to the other side seam. This will help you see how much you need to stretch the elastic while sewing. With the elastic on top of your drawn line begin stitching. Use a regular stitch length and thread but pull the elastic while you stitch. I had to keep mine fairly tight as I stitched. I made the mistake of letting up a bit near one side seam and ended up having to redo half of it...hopefully I can save you the trouble of ripping out the elastic stitches! KEEP PULLING IT THE WHOLE TIME. Once the pieces of elastic meet, overlap them slightly and stitch it down.


And...viola, you have a quick and cute top. I hope you have enjoyed the tutorial, please feel free to email me with questions- 2ndstorysewing at gmail dot com. 


Shannon