Showing posts with label dresses. Show all posts

Saturday, August 10, 2013

Strapless Maxi Dress Tutorial


Whew...I finally dug out of my craft room redo, prepping for a garage sale and staining leather furniture (more on that soon) to actually sew something. A couple days ago I decided to try making a strapless fitted maxi dress using two thrifted fabrics. I am pleased with the way this turned out. You can dress it up or down and the best part...it cost me about $5. This dress took me a little over 2 hours from start to finish, but that was while figuring things out, having a horrible battle with twisting elastic, and taking photos...so I am guessing you could complete it much faster than me if you give it a go. Would you like to make one? The tutorial is below. As always feel free to ask me questions at 2ndstorysewing at gmail dot com.

STRAPLESS MAXI TUTORIAL

1. Gather your supplies: About 4 yds total fabric. I used a 1/2 yd piece of thrifted fabric for the top. I am not totally sure what it is but it feels like some sort of polyster knit. It stretches but is a bit scratchy to the touch and I used a 3 yd piece of blue light weight knit (not totally sure on the exact kind) for the skirt and top lining. The skirt used extra yardage because it was cut on the bias. You will need a sewing machine, serger (optional), thread, scissors, and 1 1/4 inch elastic.

2. Begin by creating your top. You will need to take some measurements to create your pattern. First, measure under your armpits, all the way around your body. For me, this was 33 inches. Then measure around your lower ribcage, or where you want your top to end. For me, this was 29 inches. Now, divide both of those numbers in half, for me this was 16.5 and 14.5 to use on your pattern. Finally, measure from your armpit down to your ribcage, or where you want your top to end. For me, this was 10 inches.  Add one inch to this number for your pattern = 11 inches for me. Now sketch the following measurements on your fabric. (NOTE: You do not add seam allowance to the upper and lower measurements b/c you want it to be quite fitted.)
When I drew mine on my fabric, I did it as follows. First, I drew the 16.5 inch line across the top, then measured straight down 11 inches and marked on each side of the 16.5 inch line. From those marks, I measured in one inch on each side and marked (this was the marks for the start and stop of the 14.5 inch line since it was two inches smaller than my top line.) Then I used my ruler to connect the 16.5 inch line to the 14.5 inch line. The pictures show this below. 


Once you have your pattern drawn, flip the fabric on top of itself and cut out so you have two main fabric top pieces. Then place those pieces on your lining and cut 2 pieces.

3. Stitch and serge (or zig zag stitch) your two side seams on your main fabric. Place fabric right sides together and use a 1/2 inch seam allowance. Then repeat with the two lining pieces. 


4. Now it is time to put the lining and main top piece together. First, turn your main fabric right side out and have your lining fabric inside out. Now, slide your main fabric piece inside of your lining fabric until the meet at the top (the 16.5 inch side). Make sure your side seams line up and then stitch a 1/2 inch seam allowance all the way around the top, then serge. 


5. The first picture above shows what it should look like. You should have three edges sewn and the the bottom edge open. Now, open your fabric and press the seam towards the lining. 

6. Turn the fabric right side out and press again, making sure your lining is fully behind your main fabric. Then topstitch close to the top edge. After you top stitch, measure down 1.5 inches from the top of your fabric and make a line all the way around. This will be your stitching line for your elastic casing. Stitch on your marked line, leaving a two inch opening to insert your elastic. Next, take your 1 1/4 inch elastic and cut off the needed amount. I wrapped it under my armpits to determine the length. I wanted it snug but not so tight that it was uncomfortable. 

 7. Insert your elastic through your 2 inch opening using a safety pin. Feed the elastic all the way through your casing and overlap your two elastic ends. MAKE SURE YOUR ELASTIC IS NOT TWISTED...(enter the 30 minute fight I had with my elastic here)...Now, stitch your overlapped elastic ends using a zig zag stitch.  Now, go back and stitch the two inch opening closed. The center pic shows what this top should now look like. Now, onto the maxi skirt portion.

8. For this skirt I used a maxi skirt block that I already have. It originally came from Elle Apparel's website and since she now sells the pattern, I didn't want to put the pattern pieces on here. Here are a couple resources you could use to create your own or purchase a maxi skirt for this tutorial:
Elle Apparel's Maxi Skirt or U-create crafts Free Maxi skirt tutorial

I cut my skirt out on the bias for this dress. For info on cutting on the bias, see HERE. When I used my maxi block I originally thought I would have to add several inches at the waist for it to be tall enough. However, later in construction I realized this was way too small. So, disregard my photo showing the addition of 7 inches to the waist and instead only add 3 inches to the waist. Then I used chalk to match the new waist line to the side seam.

9. Once you have your skirt cut, stitch and serge the side seams using a 1/2 inch seam allowance. Take your open edge of your top and baste. Now it is time to insert the top into the bottom. Have the top right side out  with the top edge at the bottom and the skirt wrong side out. Slide the top inside the bottom, matching side seams. Slide it all the way in until the two straight edges meet. Pin and stitch using a 1/2 inch seam allowance.
 10. Turn right side out and press. Finally, hem the bottom of your dress. For this dress I tried this great tip from Mabey She Made It, for hemming a curved edge and it worked great. My knit was a little difficult to work with for this technique, but I would still use it again in the future. It made a beautiful clean hem with a little weight which is nice.


 And that's it. I hope you could follow these directions...it always sounds so much better and easier to follow in my head. But, if I was not clear, feel free to ask questions.


Pair with a jacket for a more relaxed look.
    Dress: DIY Denim Jacket: Polo (old), Necklace (from my latest Stitch Fix...love that service!)


Looks like a longer slip would be better...my fabric was a little sheer (oops).

Have a great weekend, Shannon


Tuesday, June 18, 2013

Maxi Dress Tutorial Revisited


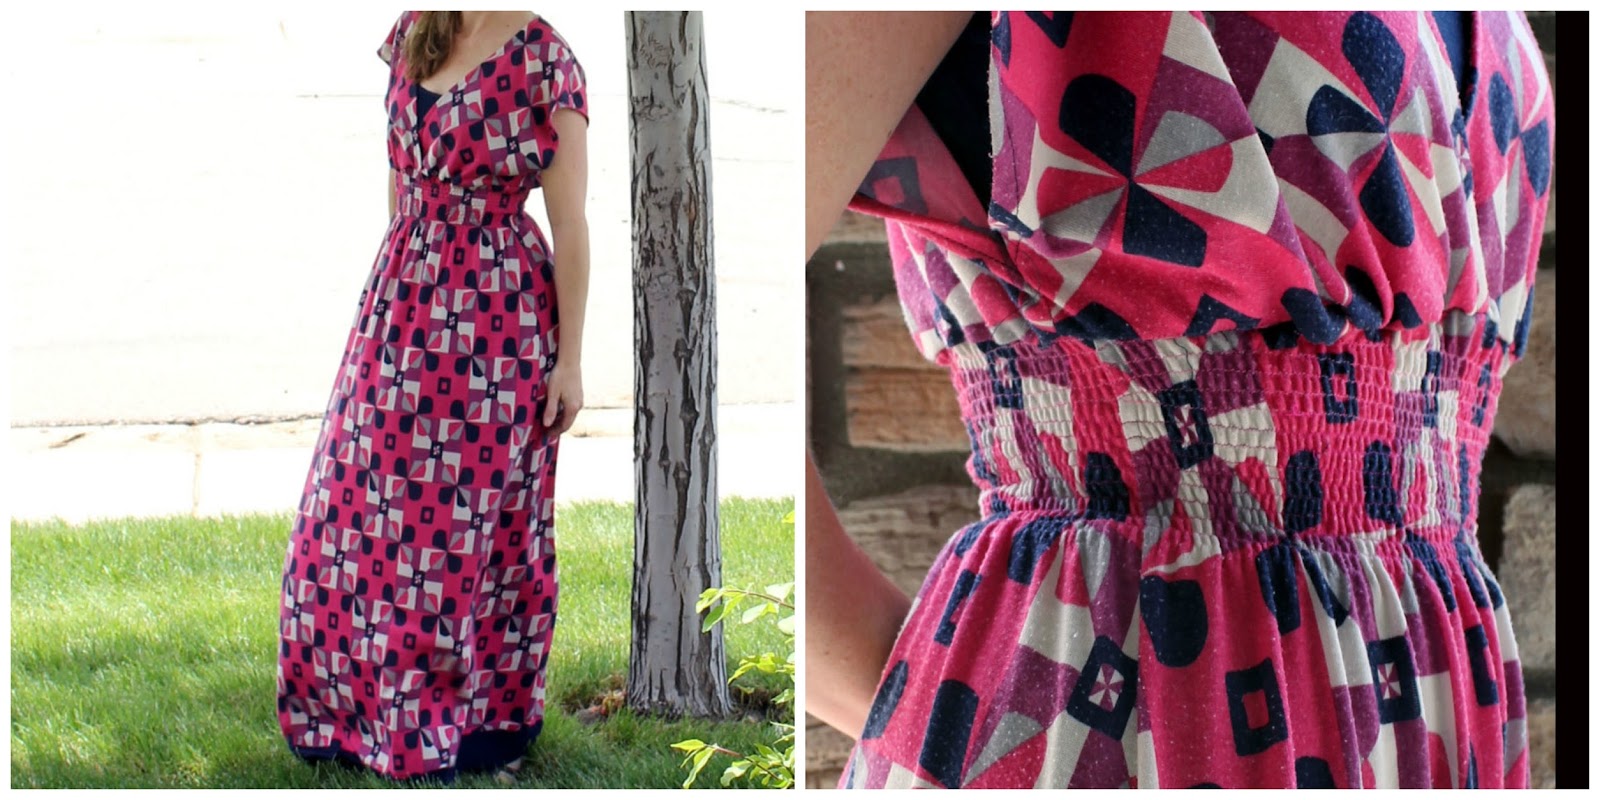
I recently completed a dress that was 3 years in the making...and several different things. I picked up this knit print in Arizona a few years ago at a large fabric warehouse. I tried to make it into a maxi dress early in my sewing clothes days and it didn't work out well. Then I attempted to turn it in to a high waisted maxi skirt with elastic thread around the top section, but I wasn't thrilled with the outcome. So, I turned to my Maxi Skirt Tutorial and combined the top of the dress with the elastic waist skirt to create a maxi.

After I combined the top to the skirt, the finished dress was too short, so I added a band of navy knit around the bottom and it is now finally completed. This maxi is one of my favorites. I love the comfort of the dress and the way the elastic waist allows it to be worn with no belt or sash.


 To add the elastic shirring at the waist you just need to add elastic thread to your bobbin and sew as usual. You do have to hand wind the bobbin with the thread and rethread often if you are making this many rows. This dress has about 12 rows of shirring, each about 1/4 inch apart. Use the side of your sewing foot to guide you. This stitching should be much straighter than mine, but like I said, most of this was in my early days of sewing...so I worked with it :) And it hasn't really bothered me when I have worn it. The thing that does bother me is the fabric is piling...what am I doing wrong? I wash it inside out, hang dry and it is already looking really worn. Guess I need to research that side a bit and try to fix it.


I am currently working on another maxi using my peplum top as a base...I hope to have the pattern and tutorial done soon! It seems to be taking me forever to get anything completely done these days.


Shannon

Monday, May 27, 2013

Project Sewn Signature Style


When I first saw the list for Project Sewn weekly challenges, I was most excited about this final week.


It seems easy for me to recognize things that appeal to my signature style. I am definetly a classic dresser. I love dresses and skirts with clean lines and classic silhouettes. I also love heels. I actually used to wear heels all the time (up until about 8 months pregnant with my first). Since kids, I have modified to wedges and actually have several flat shoes in my closet now (something I never had before!). I also am drawn to basic colors, especially navy blue. Seriously, I have a small weakness for all things navy blue! So, looking through some style icons I guess I could say I love the style of Jackie O. Here she is in a lovely sheath dress:

Photo Source: http://trippingthistles.tumblr.com/post/29823461705

Then one day while looking at Pinterest I came across this and I instantly fell in love:

Source: www.modcloth.com
More info on the dress found here

What is not to love? Navy blue with cream, pleats, a lovely silhouette...I had to have it. (oh, and it has pockets...awesome!) So I set out to make it. I bought 4 yards of some inexpensive navy blue cotton from Joanns. It was only $2 a yard (not the highest quality, but I wasn't sure if it would turn out). Then I bought the cream broadcloth (3/4 yd for a couple bucks too.) So armed with $10 in fabric, a heavy metal separating zipper, and 2 patterns from my stash I got started. 


For the bodice I used Butterick 4443. I cut a size 10 and ended up taking it in quite a bit at the chest. I had made this before and found it to be too baggy in the bust. (poor me :( haha) The only downside is I ended up losing the pleating detail at the neckline. I tried to make it work...but it just didn't fit with this pattern. 


For the skirt portion I used McCalls 5591. I used view C and made a view alterations. I cut a 12 and ended up losing quite a bit of fabric to make it work. Similar to the inspiration dress, I lost one pleat in the back and made only two. I also did not use the yoke pieces for the pattern. It took a lot of seam ripping and basting to get the top and bottom pieces to line up correctly, but in the end I am happy with it. I cut off about 4 inches from the hem and added a strip of cream broadcloth at the hemline. 

                         
I tried a new technique with this dress called bagging the lining (or I think that is what this technique is called). I had pinned a link to it and decided to give it a go. I really enjoyed it and it worked great. It helps eliminate a lot of the hand stitching which is always a plus in my book. In the original dress there is no lining, but I added one to the bodice. If I would have had enough fabric I would have done one for the skirt as well, but a slip will have to do. 


I am really excited that this dress turned out. In the future, I will have to trust my sewing skills more and allow my pocket book to be stretched for better fabric or find a fabric store to send me some free samples...anyone, anyone? 


Please stop by Project Sewn to see all the lovely looks people are creating.
Shannon

Friday, May 17, 2013

Black and White Striped Maxi Dress

 Dress: DIY (tutorial found here) similar found here, Denim Jacket(old) Polo, gold belt: thrifted, Yellow earrings; DIY

A few weeks ago I picked up this striped knit from Hobby Lobby with the hopes of making a maxi dress. I knew what I had in mind and was happy when I found there was a tutorial already written...why reinvent the wheel? So, please check out this maxi dress tutorial by Mimi G. If you haven't been to her site before...be warned- you will be there for a long time. She is an amazing seamstress and has wonderful tutorials.


While I am not much of a strapless dress person, I do tend to wear this jacket all the time and made it to wear underneath it. This is certainly more of a date look for me...as having 2 toddlers and a strapless dress don't really partner well. I worked hard at matching the stripes for the dress. In order to insure stripes that match make sure you pin it with lots of pins and when you poke the pin through the top layer, make sure it comes out in the same spot on the stripe in the back.


Then do a basting stitch and check your stripes. If they line up, then go ahead and stitch or serge the seam.


You would think with all the careful stripe matching I would have been careful while cutting...but I wasn't. My stripes aren't perfectly straight and this caused some interesting moments while sewing and using the stripe for a guide, but I think with the loose blousy effect it gets covered enough. And it was too short so I added a band of fabric at the bottom. Overall I am very happy with this dress but it isn't quite as flowing at the bottom as other maxis I have made, which makes for a little more constriction while walking. But it is cute, comfortable and great for beginners looking to work with knits.


Happy spring sewing,
Shannon


Tuesday, May 14, 2013

Yellow Boden Inspired Sundress


Last year my mom sent me a Boden catalog...I was in love. I saw myself wearing practically everything in there. I began ripping out pages frantically to see what looks I could try to create myself. When I came across this yellow flowered tunic/sundress I instantly loved it. 

Source: http://mysuperfluities.blogspot.com/2012/01/boden-weekly-review-roundup-lot-to-look.html- The link is no longer active on Boden's site

I found the mustard yellow fabric (Calico Print) at Joann's on sale and thought it could work. I would have loved it even more in a brighter yellow like the one in the magazine, but sometimes it easier to just use something you can find easily. 


I then used Simplicity 2696 to create the dress. I used View F with a few alterations. I lengthened the tunic to a dress length and added darts in the back to give it a little more shape. I also used the sleeves from my Schoolhouse Tunic pattern. You can see the Schoolhouse Tunic HERE, HERE and HERE. (tad obsessed...no?) Overall I am pleased with this dress. I kept sewing the front neck slit on crooked and ripped it out several times. In the end, it is still not perfectly straight but I became so frustrated I had to stop the madness and just go with it :) This makes for an easy spring or summer dress to toss on with sandals. 

Now...here's to hoping the sunny warm weather sticks around...and lots of self tanner to prevent blinding people with my pale legs :) 

Shannon


Saturday, April 27, 2013

KCW: The Maggie Mae Tunic


Well, it is at the end of the week, but I am finally adding some participation over at Kid's Clothes Week. Yesterday I felt the need to whip up one of these cute Maggie Mae Tunic's for an adorable little girl. My friend Bethany's little miss thing is just adorable and I thought she could use a Maggie Mae. I dug through my stash and found a vintage pillowcase with some embroidery that I thought would be super cute. I originally intended the top to be all white but messed up while cutting...I think it was a great mistake! The back has green buttons to play off the green embroidery on the front. I didn't cut the pattern out as intended on the bottom so that the embroidery would stay in tact. In doing so, I miscalculated the length a tad...but I saw it on last night and it makes for a super cute summer dress. This is my second time sewing this pattern. You can see the shirt length version here.


I hope she can get some use out of it with the warm spring weather we are finally enjoying! 

Shannon

Wednesday, May 9, 2012

Green Dress

I was so hoping to get in the sewing room last weekend, but it just didn't happen!  May is insane with the end of the school year and everything that needs to be done for Kindergarten Graduation.  We may go a little overboard at our school, but it sure is the cutest thing I've ever seen!

I, once again, was inspired by Pinterest to make a dress like this one.  I decided to make it an even easier project than the original post I saw.  I went to the thrift store (where I get all my best fabric) and found a tank top and a dress that would match.  I didn't care what the dress looked like as I was only using the fabric from it.  I simply cut the skirt away from the top of the dress and already had my lined skirt done.  Then, I figured out where to cut the tank and attached them with the sewing machine.  I wanted something to cover up the seam, so I braided a belt and called it good!


With Summer coming, who doesn't love a fast and easy project to add to your wardrobe?!

Betsy

Saturday, April 28, 2012

Schoolhouse Tunic Take 2...well 3


I posted earlier about the first schoolhouse tunic I made using Sew Liberated's pattern. Due to the higher cost of this pattern I wanted to make sure I used it several times. I had decided to try to make it as a dress for a variation. I really wanted to make myself a top out of this Amy Butler fabric I had been holding on to. I had to piece together this one because I didn't have enough fabric and the end result...a way too small dress. So, lucky for Betsy...she is a lot smaller than me and it fit her. Since I happened to be at her house while making it, I just tossed it over to her and tried to move on...which was hard, I loved that fabric! Here is a pic of the finished dress. The two alterations I made were leaving it sleeveless (adding bias tape facing instead) and cutting it longer to make a dress.


Oh well, on to take 3. This time I used a lovely fabric I found at the thrift store. It was actually two curtain panels but I loved it and for $8.00 I was able to make a dress and a tunic out of all this fabric, with some left over! I would say it was a good deal. Again I added several inches to the bottom of the pattern, just continuing the slight a-line, to create a dress length. Overall, I like the finished dress but I think I will stick to the tunic length or shorter for future projects using the Schoolhouse Tunic pattern.
Shannon