Saturday, March 31, 2012

Sweatshirt Refashion

After seeing this amazing sweatshirt refashion here, I decided I had to make it.  Around the same time, Shannon made one too!  I followed the tutorial exactly how it is written, but there are a few things I would change when making it again - and I will make it again since it was easy, cute, and simple to add your own touch to.

I used a long sleeve t-shirt that I loved the fit of to base my sweatshirt refashion out of.  Turns out, I forgot that sweatshirt material doesn't stretch as easily as t-shirt material.  Duh, right?!  I will definitely make the sleeves wider next time so they aren't so tight on my arms.  I also added a little ruffle to the edge.  I did this because, again, I wasn't thinking about how the material would lay differently and needed some extra fabric in front.  I like the "mistake" though.  


It would be so simple to add your own touch to this by changing the color of the sweatshirt, ruffling the edges, adding flowers, whatever fits you.  I like this one plain and simple, but I can't wait to make another one to see what else I can come up with!


The BF and I took a drive the other day to enjoy the sunshine and to take some shots of some clothes with different scenery then my neighborhood.  It was SUPER windy, so please ignore my crazy hair!  It's about the clothes anyway, right?


Here is Shannon's sweatshirt refashion using a thrifted Old Navy blue sweatshirt.:


Happy sweatshirt making!!
Betsy

Thursday, March 29, 2012

Little Green Junebug Dress


I stumbled upon this retro green and polka-dot fabric at the thrift store. Something about it caught my eye even though it was polyester and very bright. I picked up several yards of it for a few bucks and decided to make a couple dresses, one for me (tutorial coming soon) and one for my daughter. I was searching for an A-line style dress with a retro feel. I came across Jess at Craftiness is not Optional's sew along for her Junebug Dress. I created this dress for my daughter with a few alterations to the pattern.

1. When creating the bodice flap I added piping. I began by pinning the piping on to the right side of the flap and basting it in place. Make sure you cut slits in the piping at each corner to help it turn. After basting the piping, I pinned the lining to the right side of the flap and stitched it closed (sides and top only) per Jess' tutorial. Then flip the piece right side out and press.

2. I only had enough room for 2 buttons instead of 3 because the ones I had on hand were so large, so I modified the pattern by only making 2 buttonholes on each side of the flap.

3. I wanted a pleat in the front and back of the skirt instead of gathering it. I went for a pleat because of this fabric's bulkiness. When gathered it creates a very full effect.  I wanted the fabric to lay down flat in a more defined A-line so I went with pleats instead. First, I took my skirt piece and measured across to find the center of the front and back. I marked it with a pin and then measured 2 inches out from each side of the center pin and marked those two spots.

Next take each outside pin and fold it in towards the center pin and then back on itself to create a pleat. Do the same for the opposite side so that it looks like this when finished.
Baste the pleat and iron it down flat. Make sure you press the pleat a good ways down your skirt to hold it in place. (I didn't do the best job of this and you can see that in the photos). Then create the same pleat in the center back of the skirt. Then continue to attach the skirt to the bodice per the tutorial. Make sure your pleats are lined up with the center front and center back of the bodice before sewing them together.

4. The only other modification I made was to shorten the dress. I wanted more of a mini dress length so I probably shortened the dress a good 4 inches or so from the pattern measurements. I took a gamble and stitched it before trying it on my daughter- luckily it was not too short.

 Overall it made for a cute little dress...if only I had made it in time for St. Patrick's Day!

Shannon

Linking up to the following parties: pincushion creationsShwin and ShwinTatertots and JelloKojo Designs, Country Momma Cooks: Link & Greet #12love notes by lauryn

Wednesday, March 28, 2012

Woven Back Shirt

I saw this pin on Pinterest (from this site here) for a shirt with a woven back, and was immediately inspired to try to make my own.  I had this navy knit fabric staring me in the face for about a year, and was on a navy kick since I got these cute new gold shoes (yes, this is how I choose my outfits/sewing projects often).  Since I made this before the creation of our blog, I have no pictures of the procedure.  I will do my best to explain, but please let me know if you have any questions or if something doesn't make sense.


Since I didn't want to worry about matching fabrics, I made this shirt from scratch.  I am sure it would have been a lot easier if I had found a t-shirt and matching knit fabric.  I used a shirt that I knew I liked the fit of as my pattern.  I cut all the pieces (front, back, sleeves) from this fabric.  I wanted short sleeves instead of long sleeves, but it would be easy to make it with long sleeves too.


Before sewing any pieces together, I worked on the back of the shirt.  I cut slits horizontally about an inch and a half apart.  You could do wider if you want.  Make sure you don't go too close to the top or bottom.  The back gets heavy once you add the weave into it.  Next, cut strips from the extra fabric that are about an inch and a half to two inches wide.  These will get woven vertically.  I then put a stitch at the top of each "over" piece to keep it in place.  Originally I did not do this, but I didn't like how bunchy it got.  I like a lot of random, but it was a bit too much even for me.  Now it feels a little more structured.


Next, sew all your pieces together - front to back, then add sleeves.  I added a band at the bottom to the shirt just to add a little more.  Easy as that, right?!  I love projects I can do in one day with materials I have at home!


It was a little windy when we took these pictures, but you get the idea of the shirt!
Betsy


Linking up to the following parties: pincushion creations, Shwin and Shwin, Tatertots and Jello, Kojo Designs

Saturday, March 24, 2012

Schoolhouse Tunic

Last week I was browsing the internet and found a link to the Spring Top Sew Along over at Made By Rae. (Go vote for my top)...


I had recently purchased this Schoolhouse Tunic pattern from Sew Liberated with the idea of finally using my Amy Butler Fern Passion Lily fabric I have had stashed away. But, when the pattern arrived I realized I didn't have enough yardage so...luckily I had been to the thrift store recently and picked up this yellow lattice type fabric. I don't know exactly what it is but it is light and had a nice drape and in my favorite color for spring- yellow. So, seeing as how I had about 2.5 yards and it cost me 3 bucks, I figured even if I totally messed it up I wouldn't be out much. 


I ended up being really happy with it overall. The front has two small pleats and the back has one large pleat in the center.
Overall, it is comfortable and light, perfect for a warm spring day. It is a little tight across the bodice so I think on my next one I will add a bit more room. I've begun cutting it out in the Amy Butler fabric I originally intended to use. I am having to be a little creative and will have to add a center back seam and possibly make the sleeves shorter but hopefully it will turn out. As for the pattern, I would highly recommend it. While it is a bit pricey (I usually don't pay more than a dollar or two for a pattern) it does come together easily. This was a big splurge for me so I plan on making a few more and varying it up a bit each time. The whole top took about an hour to sew together. So, head on over to the Sew Along and check out all the cute creations! 


Shannon

Friday, March 23, 2012

All Aboard


Today was a beautiful day in Colorado. I have decided to take on the task of potty training my daughter and woke up thinking we would stay close to home today. But...the weather looked so nice and there was a Facebook thread about a park play date so I thought, I better get out and enjoy the day for a bit. One problem...I was still wearing pajamas and no make up. So, I quickly decided to throw on my favorite hat to hide my greasy hair and slather on a tiny bit of makeup. This hat has become my favorite for two reasons: 1. It is the MOST comfortable hat. I can wear it all day and it never bothers me. 2. I have the tiniest head and it is very hard to find hats to fit, since I made this one it is sized for me. Now, the reason I call it "ALL ABOARD" is because my loving husband always reminds me that he thinks I look like a train conductor when I wear this. But...I wear it anyway. Hopefully I don't look too silly.

This hat comes together quickly (under 30 minutes) and uses an old t-shirt. It is a great way to create a hat that is fitted to your head and save money by recycling an old shirt. A beginner could tackle it quickly and the good news is you leave a lot of edges raw because it is kind of the "worn" style of the hat. You could change up the embellishments or leave them off completely. I made this last year and am thinking it may be time for another one or two to add to my collection. Here is the tutorial for this hat created by At 2nd street.

I am so excited to post about the tunic I created for this competition:


I used the Schoolhouse Tunic pattern from Sew Liberated and some fabric I picked up at the thrift store. Now, I just need to get a photo of it on this weekend so I can submit to to the above competition.

Shannon

Thursday, March 22, 2012

Homemade Laundry Detergent

I found this sticker on a blog years ago, if it is your design please let me know so I can give credit...I can't seem to find the link anymore.

For the past couple of years I have been making my own homemade laundry detergent. It is much more cost effective and I actually enjoy making my own. Through trial and error I have found a couple things that make a difference. First, I make powdered detergent not liquid. The liquid is way more time and labor intensive to make. While I did get many more loads out of the liquid version, for the amount of effort it took, I have prefer the powder. Second, I use a food processor to make the whole job much easier and faster. While I am sure this is probably a big no-no, I can't begin to tell you how much faster the job is and my arm doesn't nearly fall off grating the soap. So, if you would like to try your hand at creating your own laundry detergent here is what I do. **There are many recipes on line for detergent so if you can't find these ingredients you may have better luck with another recipe.**

 What you will need: 
1 cup Borax 
1 cup Arm & Hammer Washing Soda
 1 grated bar of Zote soap (I used to use Fels-Naptha Soap and it is still the only soap I can find locally. My sister lives in Colorado Springs and has been able to find Zote. She recommended it and I now prefer it to the Fels-Naptha.)
 Food Processor
 Container for your detergent 


First, take your bar of soap and cut it into smaller blocks. Add a few pieces to your food processor and pulse until the pieces are the size of fine pebbles.

Continue adding your soap chunks until the whole bar is grated finely. Then, to further save time, I dump in my Borax and Washing Soda, give it a few pulses and viola- the detergent is mixed up and ready to use.

The whole process takes under 10 minutes and is worth the effort. I use 1 to 2 tablespoons of detergent per load. My family all has sensitive skin and my husband breaks out to almost all laundry detergents, his skin is fine with this recipe and it gets the clothes clean. The only downside is there is no scent. I like the smell of clean laundry so I think I am going to experiment with essential oils to see what I can come up with. If you have tried essential oils I would love to hear feedback or any other tips you have for making the detergent even better. I have also been tempted to try my own dishwasher detergent...anyone recommend it? Shannon

Thursday, March 15, 2012

Shirt Refashion

Last spring I was cleaning out my closet and came upon a shirt from Ann Taylor that I no longer wore because it was too short. I had been seeing all sorts of cardigan refashion posts and decided to give it a try. It only took about 30 minutes and it gave new life to a shirt that would have been tossed. My top was created based on this tutorial.


The top began as a V-neck. I cut straight down the center front of the shirt, making sure to only cut the top layer. Next, I took another white tshirt from the donation pile and cut two 2.5 inch wide strips long enough to stretch from the top of the shirt to the bottom once ruffled. I ruffled each strip and sewed it on to the shirt...and I was done!

Shannon


Tuesday, March 13, 2012

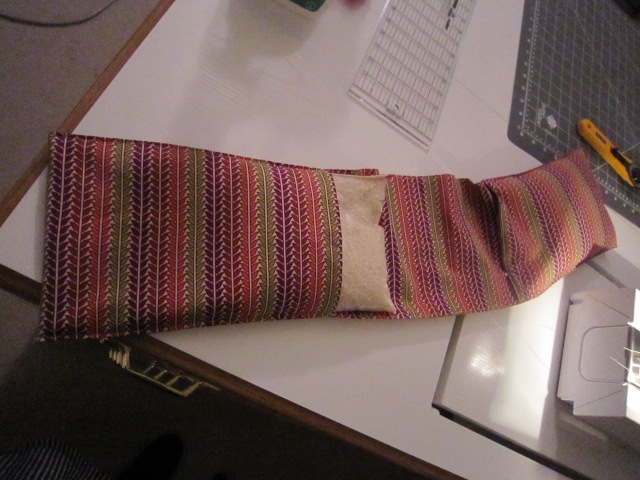
Weighted Sensory Lap Belts


Being the thrifty teacher that I am, I am always looking for cost effective ways to supply my classroom with what it needs.  In this case, I needed sensory lap belts and found them online for $35-$50 each.  Don't know what they are?  They are a *lightly* weighted piece of fabric that drapes over a students lap to remind them they are supposed to be sitting.  They work on chairs and on the carpet, and do wonders for any sensory kiddos.  Well worth the effort to make, but not the money to buy (in my opinion).  Not when I can make 5 for the price of one.  Granted, I got REALLY inexpensive fabric since there was a fabric store closing near my house.  I am dying to make other things for my home out of the other fabrics I bought, but that may have to wait until Spring Break!

What you will need for this project:
  • 1 yard of fabric
  • storage size baggies
  • rice
  • thread
  • sewing machine
You will need to cut strips of fabric 15 inches wide.  Cut selvages off.  Lay fabric pieces on top of each other right sides together, and sew pieces together on the short edge using a 1/4 inch seam.


Cut strip to 52 inches.  This seems to be a good length for an average Kindergarten aged student.  I made a couple a little longer for first and second grades.   Next, fold in half the long way with right sides together, and sew 1/4 inch seam on long side only.  Turn right side out and place seam in middle of strip.  Press.


Fold short ends under 1/2 inch.  Press, then top stitch. 
Fold edges over 10 inches on each side.  Top stitch long edges.


Fill two storage size baggies with rice.  I used the cheapest rice I could find at the grocery store.  I sealed the baggie then taped it shut also.  Insert one baggie in each side, and sew it closed.


Voila!  You have your own version of a sensory lap belt!
Betsy

Monday, March 12, 2012

"Here Comes the Sun" Dress

A couple of weeks ago I found a pin on pinterest that caught my eye. It was for a maxi dress tutorial and used a tank top and knit fabric to create a cute and comfortable dress. One night in bed I had this picture of a yellow and white dress pop into my head with a ruffle on the bottom...does anyone else dream up their projects as they try to fall asleep? That seems to be my most creative time! And here is how it turned out...


Want to make one? I highly recommend it. It comes together quickly, it is inexpensive, and the one day I have worn it so far I was flooded with compliments...can't beat that!

What you will need:
A tank top
Knit Fabric that is wide enough to wrap around your body one and a half times and long enough to create a maxi dress and enough left over for a ruffle and sash.
Elastic Thread (a must for this project)
Scissors
Sewing Machine

For my knit fabric I used a bedsheet that I bought at a thrift store a couple weeks ago. It was $6 for the sheet and was a wonderfully soft jersey knit and happened to be in this lovely mustard color. I first trimmed off the elastic casing and rounded corners. Then using a straight edge and rotary cutter I created a rectangle from the fabric wide enough to wrap around my body one and a half times and plenty long enough. I used an old tank top that was too short to be worn anymore.


I created the main dress using the tutorial referenced above. Her use of elastic thread is brilliant and helps create ease when taking the dress on and off. Once the dress was completed I decided to add the ruffle from my dreams (ha ha). I cut three 2 inch wide strips that were each the width of the dress.

Sew the three strips right sides together on the short ends to create one long strip of fabric. Next sew a long stitch (my longest stitch length is 4) all the way down the center of the strip. There is no need to finish the edges as it is knit and won't fray. Next, pull the thread using the bobbin thread tail and watch your fabric ruffle easily.

I then hung my dress on my dressform and began pinning the ruffle onto the bottom hem of my dress.


 I then stitched the ruffle on to the dress and called it good! On a side note, a real seamstress would probably attach all three pieces of the ruffle together to create a circle prior to attaching it to the dress. But since I only pretend to be a real seamstress I was lazy and skipped this step. Instead, when the two ends met as I stitched the ruffle to the dress, I tucked each end of the ruffle under by about a half inch, overlapped the pieces and sewed. It still hides the seam and gets lost in all the ruffles.

The day this dress was finished was beautiful all around. My hubby watched these two cuties while I went to a BLOG meet up hosted by Ashley from this great blog Make It and Love It
Not sure if my toddler or husband picked this outfit...
but she is rocking it anyway


And my hubby bottled his latest homebrew batch -Apricot Blonde- yum! Can't wait to sip one of those while wearing my new dress and soaking up the sun.
Shannon

Thursday, March 8, 2012

Baby Gifts Part 2

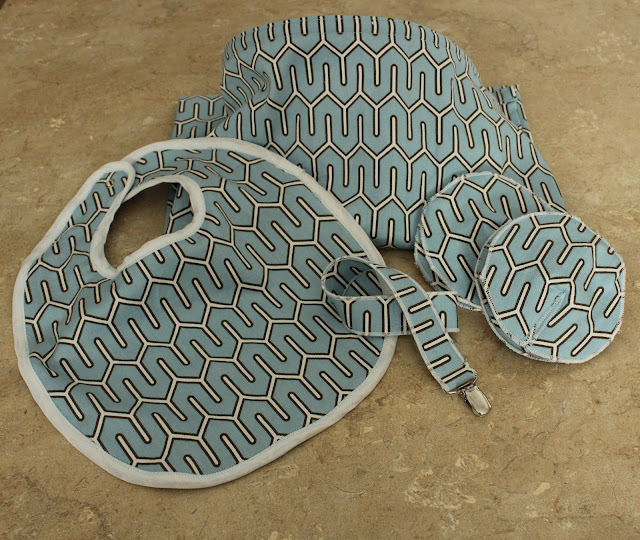
After creating the structured fabric gift baskets (HERE) and the baby onesies (HERE) I finalized the baby gifts with a couple more individual touches. The mother of one of the new baby boys had requested a nursing cover. Last summer, when I was nursing, she had liked how my cover was made out of a heavier material. I prefer using a home dec weight fabric when sewing these or making them double sided if they are out of regular cotton print. For this cover I used some left over fabric from my son's nursery. This fabric is from the Dwell Studio line and is called: Maze Work Azure. You can create one of these nursing covers using this great and easy to follow tutorial: Nursing Cover Tutorial


I then decided to keep using the left over material and created nursing pads. I had made myself a few sets of these and loved that they were washable. Here is the tutorial I followed when making this set.


In each gift basket I included a pacifier clip. I was never smart enough to use one with my first child and my second child never took a pacifier...so I hope these will get some use as it seems like a very helpful gadget. I love Dana's tutorials on MADE. Here is one of her many great tutorials:  pacifier-clip-tutorial


Finally, the little baby girl's basket included a sweater with a flower pin. I took a baby sweater from Target and added a little pop of yellow. I have a small addiction right now to all things grey and yellow. There are several great fabric flower tutorials on line. For this particular pin I used this tutorial.

Whew...that was a lot of tutorials. Now maybe I see why it took me so long to put these gifts together. :) I think I am going to take some time and try to sew something for myself for a change next!

Shannon

Tuesday, March 6, 2012

Baby Onesies

As part of the baby gift baskets I posted about earlier, I included a onesie in each package. For the two little boys I took a blue and white striped onesie and added the baby's first initial using appliqué technique. There are several great tutorials on appliqué all over the web.
Here is a quick version of how these came together.
What you will need: 
A onesie in your choice of color/pattern
Scrap piece of material (a 6 inch square should be plenty)
Paper Backed Fusible Web such as Wonder Under or Steam a Seam 2 (enough to cover your applique shape or letter)
Scissors
Iron
Stencil of your shape or letter to be appliqued
Sewing Machine
thread
  First, I created my stencil using my cricut machine. It is not necessary to use a cutting machine but it is faster. It would be even faster if I could get my cricut to cut the fabric directly, but no matter how many tricks I have tried I can't get it to work. If you know the secret...please fill me in. I cut the letter "m" and the letter "t" out of cardstock paper. Next I took the stencil and used it to trace the letters BACKWARDS on the back of the Wonder Under. You want to trace the letter backwards so that the right side of your fabric is facing out once it is ironed on to the onesie.

After I traced the letters, I placed the Wonder Under onto the back side of my fabric. For these shirts I used a flannel recieving blanket. I love how soft the fabric is and tends to hold up better in the wash than felt. I pressed the iron down firmly following the fusible web's package instructions. After I ironed on the fusible web I cut out the letters following my tracing lines. I then peeled the paper backing off the cut out letter and placed it on the onesie.

Once I was happy with my placement I ironed the letter on, again following the fusible web's package instructions. As a final step, I used a straight stitch and edgestitched on the applique. Many people use a zig zag stitch for traditonal applique but I prefer the straight stitch for this particular design.


For the little girl's onesie I created a necklace appliqué. I have seen several styles on Etsy and Pinterest and decided to dig through my supplies and see what I could put together. Here is what you will need to recreate this look:
A onesie in your choice of color/pattern
Scrap Fabric (enough to create your necklace "beads")
Giant Ric Rac in your choice of color
Paper Backed Fusible Web such as Wonder Under
Sewing Machine
Fray Check
Thread
Scissors
Iron
First, I took giant black ric-rac and placed it on to the onesie to determine the desired length of the necklace. I cut the ric rac and used fray check on the ends to make sure it would not fray. Next I placed a narrow strip of steam a seam onto the back of the ric rac. The backside of the steam a seam is slightly sticky once the paper backing is peeled away. This helps keep it in place on the onesie while you iron it on. After it is ironed on, stitch it on using a straight stitch to insure it is firmly attached. I sewed down the center of the ric rac.

Next, cut three small circles from your scrap fabric and Wonder Under for the necklace "beads". Attach the Wonder Under to the fabric circles following the fusible web's package instruction. Determine where you want the beads to be positioned on your necklace. Peel off the paper backing and iron the "beads" on to your ric rac necklace. Finally stitch the beads on to the onesie for added durabilty. I first tried using a straight stitch around the outside of the circle but did not like the finished look. I instead chose to use a narrow zig zag stitch around the beads.

I hope the new little babies look adorable in their new shirts.
Shannon

Friday, March 2, 2012

Baby Gifts

The past few months have been busy for a few friends. Three adorable new babies are now here! Months ago I decided to sew something for the new bundles of joy but I had a case of sewing ADD. I would start a project, then immediately decide to do something else and begin that. Then, after another idea would pop into my head, I would change projects again. So...3 months later, I actually finished all three gifts and they somewhat follow a theme. I was originally going to create the same thing for everyone, but then the ADD took over. So here is what I came up with:All three gifts were packaged in a fabric gift basket following this tutorial:

I actually made 5 baskets in the hopes that next time one is needed, I will have it ready to go. I followed the tutorial exactly except for the gray and orange basket. For this one I decided it needed a pop of orange and I didn't have any orange ric rac so I attempted to add piping. It went alright- I attached the piping to the lining piece prior to sewing the lining inside the basket. I think my machine was upset trying to manage all the layers and I am still getting the hang of adding piping so it had a few mistakes. Since sewing these baskets I have read several tutorials and books about piping techniques and look forward to tackling more projects. In a later post I will detail each gift and post the tutorials that were used.