Thursday, July 25, 2013

DIY $1 Pool Cover Up


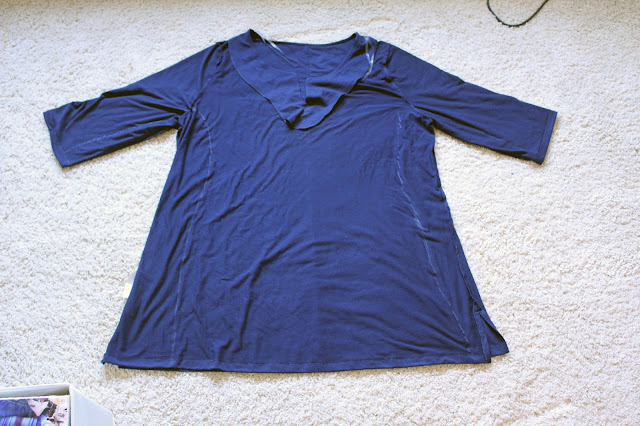
I picked up this top from Walmart for $1.00 the other day. I thought for a buck it was worth trying to make it into an easy swim cover up. This cover up started as a 1X top. I took a dress (you may recognize this is my Yellow Boden Knockoff Dress) and used it as a guide for sizing.


After I turned the navy top inside out, I traced around my dress leaving a little extra room through the hips, tapering it out to the bottom (I ended up letting it out more at the bottom than the chalk lines show below). Using these tracing lines I stitched all the way from sleeve end to hem on both sides and tried it on for fit. I adjusted it slightly a couple times to get the fit the way I wanted.


Once I was happy with the fit, I serged the seam to finish it. Gave it a press with the iron and then moved on. The top had a v shape cut into it and it flopped open quite a bit. I decided to quickly stitch a small white button to one side and a loop of 1/8 inch elastic to the other side to create a quick button closure.


And...that was it. For $1 and about 20 minutes of my time, I have a quick and easy top for the pool...now, if only I went to the pool :)


Shannon

Thursday, July 18, 2013

Pretty Quick Peplum: DIY top in 30 minutes

Top: DIY Pattern below, Earrings: Clip Clip Hooray

Don't you love it when something actually works the way you want it to? (oops just noticed some uncut threads on my top in the photo- that didn't work the way I wanted it to :) I am happy to say this little top came out exactly how I hoped and it was so fast and easy too. I whipped up two tops the other day in about an hour and just had to share this easy and cute tutorial with you. I am not yet able to grade a pattern but I have included the one I used to make my top. It is similar to a size small in RTW, but I am sure it would be easy to make adjustments as needed. The pattern also has the color blocking variation included.


If you decide to print my pattern you will need 4 sheets of paper and some tape for piecing it together. **Make sure you do NOT overlap the pieces when taping them together, just butt them up next to one another.** You will want to make sure the pattern prints to the correct size, so you will see a 1 inch test square in the corner. This should measure one inch when printed. Match the letters on the paper (A to A, B to B, etc) until you have all your pieces taped together.

                                  PRETTY QUICK PEPLUM PATTERN

When cutting your pattern you will use the same piece to cut your front and back pieces of the top. In order to do this, first cut out your back piece. Then either cut off the back neckline portion of the paper pattern or use a tracing wheel to transfer the front neckline mark to your fabric while cutting your front piece. I prefer to use a tracing wheel so I can reuse the pattern without having to tape it back together.
                                                           (Sorry for the grainy photo)

COLOR BLOCK VARIATION: If using the color block portion, cut your bodice top (front and back) out of one color using the line marked (Color blocking Line) on the pattern.(This is my navy blue piece below) Add 1/2 inch below that line prior to cutting out your piece for seam allowance. Then cut from the color blocking line and below in another color. (my striped pieces below) Also add the 1/2 inch above the line before cutting. You can now sew those pieces together using a 1/2 inch seam allowance. The third picture shows how to lay out your pieces before sewing. Have your solid top piece right side up and turn your striped piece upside down with the right side down. Slide the striped piece down until they line up and stitch a 1/2 inch seam. I then serged my seam and pressed the whole seam to one side. Now, follow the rest of the tutorial from step 2 on.

Now, on to the tutorial:

Step 1. Choose a nice knit with adequate stretch. You want something that is similar to the weight and stretch of a t-shirt. Cut out one front and one back piece using the pattern (or using one of your own shirts traced off for a pattern). Lay the pattern on the fold of your fabric, making sure the stretch is running across the width of your pattern.

Step 2: Lay the front and back piece on top of each other, right sides together, matching shoulder seams.   Stitch across the shoulder seams using a 1/2 inch seam allowance. Serge/finish seam (optional) and press towards back.

Step 3: Stitch down both side seams using a 1/2 inch seam allowance from the armpit down. Serge/finish seam (optional) and press.


Step 4: Finish your sleeves and neckline. I tried three different techniques and you can use any of the following: Option 1: Press your neckline/sleeve in 1/4 inch and press, then press another 1/4 inch and stitch close to the folded edge. **Your stitching will probably look much nicer than mine below. I was too lazy to change my bobbin thread and this is what happens when you sew it from the right side of the shirt instead of using your hem (on the inside) as a guide!**

 Option 2: Serge the raw edge and press it under 1/4 inch, then stitch it down.


Or Option 3: (Also the most time consuming) Create bias trim from your knit fabric by cutting two strips 1 inch wide by 9 inches long (make sure the piece has stretch going the right direction b/c it will be stretched around the neckline as you sew). Sew the two short ends together to create a circle. Place the right side edge of your bias tape on the right side of your neckline and stitch a 1/4 inch seam all the way around. Make sure you stretch it slightly so that your side seams line up with your bias tape seams. Then fold the bias tape in towards your neckline's wrong side as shown in picture 3 and stitch again. (The red lines show where you should stitch). Then fold it under again towards the wrong side making sure the bias is completely hidden and stitch one last time. (The red lines show where to stitch). On the outside, the only stitching that shows is the last one you did. 

Step 5: Create your bottom hem. Again, you can do a quick hem by serging the raw edge, pressing it under and stitching or a more traditional hem. For the traditional hem, press your fabric 1 inch towards the wrong side and then another 1 inch towards the wrong side and stitch near the folded edge. (sorry I do not have photos of this step).

Step 6: Insert your elastic. Cut a piece of elastic for your natural waist. I used 1/4 inch elastic and cut mine 27 inches. Mark your elastic line (on the inside or wrong side of your shirt) by using the pattern as a guide and drawing a line across both the front and the back in a disappearing or water soluble marker. This line will be your guide as you sew on the elastic.

Now, pin your elastic to one side seam, find the center of the elastic and pin it to the other side seam. This will help you see how much you need to stretch the elastic while sewing. With the elastic on top of your drawn line begin stitching. Use a regular stitch length and thread but pull the elastic while you stitch. I had to keep mine fairly tight as I stitched. I made the mistake of letting up a bit near one side seam and ended up having to redo half of it...hopefully I can save you the trouble of ripping out the elastic stitches! KEEP PULLING IT THE WHOLE TIME. Once the pieces of elastic meet, overlap them slightly and stitch it down.


And...viola, you have a quick and cute top. I hope you have enjoyed the tutorial, please feel free to email me with questions- 2ndstorysewing at gmail dot com. 


Shannon

Denim Maxi Refashion


                                    Denim Maxi: New York & Co Refashion (thrifted), Cream Tank (Kohls), Belt: Gap (thrifted)

I had a chance to wear my latest refashion today, and while I feel I have to channel my inner cowgirl for this look, I must admit it was super comfy. While I am not sure how much this look is me, I decided to go with it. I recently found this New York and Co Maxi Dress for $2.99 at a thrift store. I tried it on and to say the bust portion was small is an understatement. I am not large in the bust at all and this barely covered me...at all...so I knew it needed a new life.

I thought about how I could add a new top to keep it a dress, but eventually I decided to make a quick and easy change.

First, I cut off the top of the dress until the fabric in the front was even with the top of the back.


Then I serged the front portion of the skirt so there would not be any fraying.


Last, I simply folded the new skirt waistband in half and stitched it down near the top edge using elastic thread in the bobbin. I was going to also stitch near the bottom edge of the new waistband, but ended up keeping it fairly rough inside and just tacked it down in a couple places to keep it in place. And that was it.


It has a nice full ruffle on the bottom and looks somewhat dressed up all while having the ease of denim. The top I paired it with was nice and light and I was able to wear this to the park today in 90 degree temps and stay comfortable. Plus, I could wear it with flat sandals, which made running after the little hooligans much easier. 

I would say I am happy to have added this versatile skirt for under $3 and only a little of my time. I am definitely on a refashion kick this week...more items to come soon as well as a free pattern.

Shannon

Wednesday, July 10, 2013

DIY Towel Pants - Mini Boden Knockoff


Earlier this spring I was flipping through the pages of the latest Mini Boden. I came across these adorable pants made of towelling material.


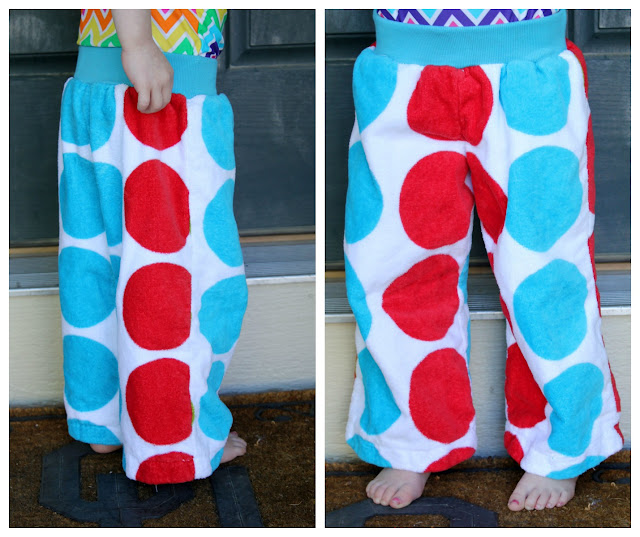
Here is my DIY Towel Pant version.


First, find yourself a cute towel. I picked up one last year from Walmart for about $5. I have seen so many cute ones out this year...but I am waiting for the clearance prices :) 


Next, find a loose fitting children's pants pattern or create your own from tracing a pair of your child's pants. For this DIY version I chose McCalls 5222. Next, carefully line up your pattern using one half of the towel. Do not fold the fabric in half and cut 2 fronts and 2 backs at once if you have a pattern that needs to line up. Instead, cut one front and one back piece on one half of the towel as shown below.


Then use those pieces to cut the 2nd piece. Simply flip them over onto the other uncut half of towel and line up your pattern. You can see how I matched my circles. I put some arrows on the photo below to help show this step. 


After cutting out your pattern, sew the pants following the instructions until the waistband. For the waistband, I decided to use a contrasting rib knit similar to the Mini Boden pants. I did not thread a drawstring through but may try that on a future pair for my son. 

Figure out how big your waistband needs to be. First, measure your child's waist. Then divide that measurement in half and determine how tall you want the waistband to be. I wanted mine to be about 2 inches tall. So, I cut 2 pieces of my ribbed knit 4.5 inches tall (because it will be folded in half and you need seam allowance to attach to the waist) by half the waist measurement. Make sure the greatest stretch is running across the width of the waistband. Next, take your two waistband pieces, place them right sides together and stitch/serge the two short ends. Press your seams. Turn right side out and fold in half encasing the raw edge. 


Now, take the top of the pants and line it up with the raw edge of the waistband, matching side seams. Make sure the raw edge is pointing up and the finished edge is pointing down towards the legs. Pin and baste the waistband on to the pants leaving an inch or two opening for elastic (in a later step). You will stretch the waistband as you go to make the two fit together. 

 **You can see in the photo sequence below that I did not realize the need for elastic until after my daughter tried them on, so it is out of order and I had to rip out my serged seams.** If I were to make them again I would add the elastic now through the opening. Use your child's waist to measure your elastic and thread through the opening with a safety pin.


After threading your elastic through, serge the basted waistband in place enclosing the opening. Make sure you do not catch the elastic in your serging stitch. And that's it. Enjoy your new towelling pants.

I have to say I kind of want to make an adult version to lounge around in...would that be weird??? Well, if I attempt it I will have to post them here :) Shannon