Monday, February 18, 2013

DIY Ruffled Burlap Tablecloth

As part of our family room makeover I decided to move out our two end tables. While I liked the furniture it was just too big for the space. One side came up too close to the fireplace and the other didn't seem to fill the space enough. I felt like a round table in the corner would be better. I had one sitting downstairs unused so I brought it up. For the tablecloth I wanted something neutral but with texture...and of course I am always looking for budget friendly so burlap came to mind. I tried it out and while it works for now, it honestly is not my favorite. Maybe a little too shabby chic for the space???
But if it works for your space and you want to see how I created it, here is the tutorial below. To be honest, there are probably much better ways to do this...I just took off with the idea and had to make this work with the width of burlap I purchased. If I did it again, I would probably try to buy wide enough burlap to eliminate the need for a seam around the top.

First, I flipped the table over on top of the burlap and traced around the top edge. I then cut out the circle from the burlap slightly bigger than the tracing line to allow for a seam.

 Next, I took the remaining burlap and pinned it to the circle top around the top edge. I did this while it was on the table to make sure it was long enough. I pinned all the way around the circle...and had to make up for not having enough fabric by piecing together a section in the back...by the way, I do not recommend this :) Be smart and buy enough fabric.

 Once I had it all pinned, I stitched the two pieces together. I used a zig zag stitch because I had read that is the better way to sew the burlap pieces and insure they stay together. Then I turned it right side out, tried it on my table and it was too short. When I pinned the pieces together, I had do what I could to make it work and unfortunately this meant sacrificing the length a tad. So I dug through my fabric stash and used some light linen type material to create a ruffle for the bottom. I cut several strips 4 inches wide and pieced them together until I had enough to go around my table.
 I ruffled the linen fabric using my serger (I am really starting to love how easy ruffling is on that machine!). Then I attached the ruffle on the exterior of the fabric at the height I wanted to have the ruffles touch the floor. I pinned it on and then used a straight stitch to attach it.


The tablecloth is pretty sheer by itself so I took a white table cloth I already owned and put it on underneath the burlap one.


 Then I placed the glass top on and called it good. An easy and inexpensive tablecloth...now, I need to decide if I will keep it or not :)


Shannon


Monday, February 11, 2013

Budget Friendly Custom Length Draperies


When we moved into this house I knew I wanted to hang curtains from the tall windows. I started shopping around and priced fabric. While I could have sewn the panels, fabric by the yard adds up quickly when you are talking about hanging curtains from 10 feet up to the floor times 8 panels. (I hung 4 in my kitchen and 4 in the family room).
On a shopping trip to Ikea I came across the Henny Rand curtains and instantly liked them (which is rare for me.) More like myself, I walked away thinking I would find something else I liked better. Well weeks went by and I kept thinking about the curtains...I know, who thinks about curtains? Well, this lady does! Now I had to figure out how to make them work. Ikea tends to carry curtains longer than most store brands (96 inches) but my tallest window was over 10 ft tall. I would need at least two more feet on the tallest curtains in the family room and the kitchen panels would also need some added length. So when I headed back to Ikea to purchase the curtains, I also picked up the Lenda curtains to add to the bottom of each curtain panel and rods, mounting hardware, and finials while I was at it.

One of the best things about the curtains is the price. Here is a breakdown of what I spent to put up 8 tall panels (curtains and rods):
-4 sets of Henny Rand curtains at $35 each = $140
-1 set of Lenda curtains at $35
-4 rods = 2.99 each= 11.96
-Mounting Hardware 1.49 each x 11=16.39
-6 finials at 4.99 for 2 = 14.97
-4 cans of Rustoleum Oil Rubbed Bronze Spray Paint - I can't remember how much I paid but around $6 a can = $24

Total = 242.32

This may seem like a lot, but considering I spent $50 dollars alone on one window curtain rod in my last house, I felt that 43.32 for all the rods and hardware was pretty good. This covered two large kitchen windows plus my large wall of windows (18 ft across). **Side note- on the wall of windows, the curtain rod is actually two rods, resting together on the center piece of mounting hardware to make it look like one continuous rod.** Add the $24 I spent for spray paint and I still think it was well worth it. The rods come in a cream or silver color, so if that works well in your house, you can spend less than I did. I also originally tried to use other finials (I don't love the Ikea ones) and those were $15 a pair...but in true Ikea form, only Ikea finials fit into their rods :)  And had I purchased fabric to make this I would have spent way more...even with coupons and cheaper fabric.

Here is how I made the curtains long enough.
 First I measured to see how much length needed to be added. I cut out that length, plus a few inches extra for hemming by the width of the curtain. Once again, as Ikea never disappoints in these things...the curtains were not the same width...just a tad off. Enough to have to correct it, ugh! So, I also ripped out the side seams once I had the length cut. I pressed it flat and laid it on top of my main panel, right sides together. I matched up the side seams and refolded the seam to fit. I quickly stitched the side seam, pressed, then laid it back on top of the main panel and pinned it together. I then stitched it on using a narrow seam allowance since I was not finishing off the back of the curtain with anything that would hide the seam.
Once I stitched it on, I left the curtains un-hemmed. I wanted to make sure they were long enough so I pinned them while they were hanging just to be extra careful. Once I had the length marked, I took them down, pressed up the hem and stitched. And that was it...not much work for extra long curtains! 

Shannon

Saturday, February 9, 2013

Coffee Table to Ottoman: A DIY Guide


One of my favorite projects in the family room was the creation of the ottoman. I had a large coffee table in here before, and while I liked the furniture, it seemed to connect with my children's heads all too often. I decided to see what I could do to create a padded soft ottoman to be used for awhile that wouldn't break the bank. Here is the list of materials and supplies you will need to create your own:

- coffee table (I purchased mine from a thrift store for $25.00)
-foam (I purchased the 3 inch foam from Home Depot for $20.00) and 1 inch foam for the sides at Joanns when it was 50% off for $20.00)
-batting (I used the batting by the yard in the foam section of Joann's. I think it was around $6.50/yd and I used a 50% off coupon. I ended up needing more than I thought so I made a couple trips :( I think in the end I purchased4 yards of the 90 inch wide batting for around $14.00)
-Fabric (this was the deal of all deals- I purchased 4 yards of upholstery velvet for under $12.00 from the Joann clearance table). Although it is a light color and will probably stain quickly with my kids, it was the right price. The next closest fabric I could find to work would have been $50. So, for now it will work...and more poor children have to succumb to thorough cleaning and checking all their clothes after every meal before the go in the family room.
-cording for the piping- 5 yards of 9/32 inch cord for about $1 a yard...I think it was then 30% at Hancock Fabrics
-4 furniture feet from Home Depot. I bought the bun foot for around $8 each= $32
-Spray adhesive
-Staple gun (already owned=free :)
-Pegboard (already owned= free)
-Upholstery thread- 3 spools for $6
-spray paint for the feet (already owned=free)
-Scissors
-Sewing Machine with a zipper foot

Total = Around $132.00

Now...on to the fun stuff. How it all came together.

I started by finding the size coffee table I was looking for in my space. This was 47" x 32". The best part about this find was the bottom shelf which would serve as a way to attach the upholstery. The four legs stuck out about 2 inches and so my husband cut them off for me to give us a nice flat bottom for wrapping fabric. 
Next, I took the 3 inch foam from Home Depot and sliced it into two pieces to make it fit. It was not quite wide enough to just lay right on top, so I just took out my Gingher Scissors, opened them up and sliced right through. I sprayed adhesive spray (make sure it is safe for foam and won't disintegrate) and attached the foam. My husband then filled in the bottom openings with some pegboard we had in the garage. I then took my 1 inch foam and filled in the bottom section, cutting and slicing as needed with my trusty scissors.
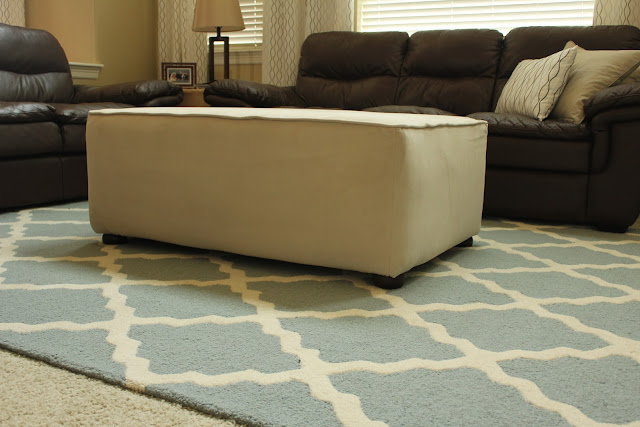
Then came wrapping the piece in batting. Again, the pieces were not big enough to fit in one piece so I had to piece two together. You can somewhat see the seam that was created in the 1st picture, but I did my best to match it up closely and create a seamless look. We flipped it over and pulled it tight as we could as we stapled it all around 4 sides. I then took muslin and created a slipcover which was also stapled on. Unlike other ottomans that are often wrapped around the sides, I knew I wanted something more tailored since the sides were so deep. **To see how I created the pattern for the ottoman please see the next picture in this post.** 
 For the pattern I cut 4 side pieces. The two short pieces were 33 inches wide by the height of the ottoman plus a few inches to allow for wrapping the fabric around for stapling. The same with the longer sides at 48 inches by the height plus a few inches. I first sewed the short and long pieces together to create a tube. I took this piece and tried it on to the table to make sure the sides were lining up on the corners and everything was snug. (You can see this in the 1st picture). I then took my top piece (which I stupidly cut at 33 inches by 47 inches instead of 48)  and created piping to go around the top with the cording and fabric. I attached the cording to the top piece using a zipper foot. There are lots of tutorials on line if you need help with piping. I took the 4 piece tube and put it on inside out, then put my top on upside down so that the right sides were together. I then pinned and pinned and pinned some more attaching it all around 4 sides. It is much easier to pin the pieces together while they are on the ottoman. This helps to ensure a correct fit. And to make up for my cutting error I ended up having to take in the side seams just a bit on each side to make it fit, but it was a tight fit. I was so nervous that it was too tight that I first hand stitched the whole thing together. This also helped me get nice and close to the piping. Then I went around again with my sewing machine for a durable seam. I stuffed my ottoman into it, flipped it over, and stapled it on, pulling it vey tightly. By having the corners sewn, instead of wrapped, I was able to keep it very tailored looking without all the bulk of the extra fabric.

Finally I spray painted all the bun feet and my hubby attached them to the bottom of the table where the original feet were. We love the new ottoman and so do the kids...so I am not sure how long my light tan fabric will make it, but for 12 bucks in fabric, I will be okay if I need to redo it one day in the future. Overall it is just what we wanted and for way less than the versions in stores.

Shannon

Linking up Here:
http://www.homestoriesatoz.com/uncategorized/tutorials-tips-link-party-96.html

Friday, February 8, 2013

Little Boy PJs


And now it is my son's turn. The first pair pictured are the ones I was originally making for my son yesterday...but this knit just did not have enough stretch and wouldn't fit over his head, so I need to make some adjustments. Instead, I dug through my stash and found another boyish knit. Both of these fabrics were from the thrift store by the way...so in the end these were some cheap pjs with a pattern I will be using for a long time. And, did I mention the pattern was only about $1.40. It is part of this pattern bundle, but only available for a couple more days at the discounted price. So today during naptime I quickly whipped out these little pjs and can I just tell you my kids love them. My daughter begs me to wear them and wants to wear them all day long! Guess I better keep em coming.


Sorry for all the pics...this little man is just so stinkin' cute I can never decide which ones to take out!
Shannon

Thursday, February 7, 2013

Polka Dot PJs


I was excited to try a new pattern from the pattern bundle I purchased here. My son is in desperate need of new pjs so I began looking through my stash and of course found all kinds of girl's knits. I did find something that would work for my son and in one naptime I put together a pair for my daughter and almost finished my son's pair. He just needs cuffs added...I will try to snap a few pictures when I get them done. These are the Alex and Anna Winter pjs and they turned out sooo cute! And the best part, they were easy to make.

This pattern bundle has some wonderful patterns and is a fantastic price...there are only a couple days left to buy. Get it while you can :) You can purchase here.


Shannon

Tuesday, February 5, 2013

Family Room Makeover

Well...I did it...kind of, I mean I almost completed my first room for my new year's challenge on time, and of course, I have an excuse. My hubby was gone for 16 days this month...that is 16 in a ROW. Ok, ok, I know that is nothing compared to what many people I know deal with on a regular basis but I am going to admit that this was excruciating hard to handle for me. The room was almost complete except for the ottoman legs and the wall art. Once he came home, it was all completed the next day and by Feb. 2nd the room was done! (Well, not quite but I will get to that later).

So, without further ado here is the new space.

 Now, I am not a designer, nor do I pretend to be, but I do enjoy decorating. This space has come a long way since we moved in. It does serve as our family room and this is also where my children play. We do not have a playroom, so the space has to be kid friendly but not overrun with toy clutter that will make me cranky. Below is a before and after shot and a quick list of projects that we tackled.

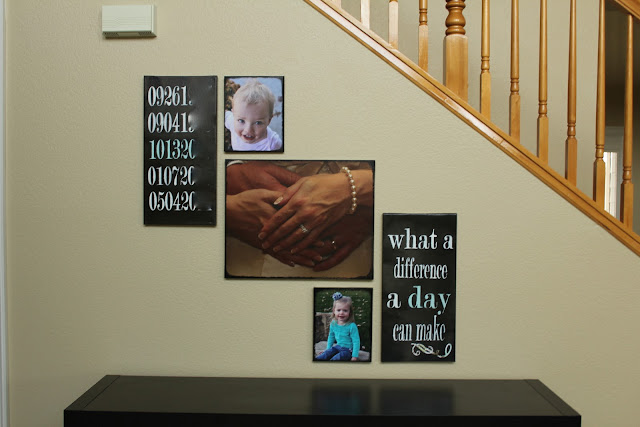
Here is the gallery wall art that you can not see in the first photo. 
Links to Posts and Projects:

Overall I am very happy with the way the room turned out. We have lots of storage for toys...(the toy bin labels are technically still not done. I had them ready and my son ruined them, so I have to redo them). I have lots of tutorials on the way, showing how the room came together and how the DIY projects were tackled. Now...on to the bad news. I did NOT meet my personal goal for January which was to drink more water. I had some improvement but no where near where I need to be, so I am keeping that my personal goal for February. As for what room is next...it is a tough call. Technically, it is supposed to be the kitchen but I think we may focus on the guest bathroom instead. However, that comes with a big tile project and major DIY, so the month long time line is going to be very challenging to meet!

Source List for none DIY Projects:

Rug 8x10  in Spa Blue:

http://www.rugsusa.com/rugsusa/rugs/rugs-usa-moroccan-trellis/beige-blue/200HJHK03A-P.html

Wicker Baskets in Media Cutout:

http://www.target.com/p/threshold-global-small-milk-crate-dark-brown/-/A-14105165#prodSlot=medium_1_10&term=milk+crate


Shannon
Linking up here:
TDC Before and After
http://www.homestoriesatoz.com/uncategorized/tutorials-tips-link-party-96.html

Monday, February 4, 2013

Sew Fab Pattern Sale


Today is the 1st day of the 1st ever Sew Fab e-Pattern Bundle Sale and giveaway, sponsored by The Southern Institute and Fat Quarter Shop!


Over the past eight weeks a lot of behind the scenes work has taken place to bring you this amazing bundle of ePatterns from several of the top pattern designers and bloggers in the sewing and blogging world.  The result is a bundle of 18 PDF sewing patterns that you don't want to miss.
Buy NowFor one week only, ten pattern designers have come together to bring you 18 of their best PDF patterns, valued together at over $139.00, for the incredible price of $24.95!  That's over 80% off of the combined retail value!  Plus you can enter to win a dream of a giveaway valued at $390 from some really great shops! For less than $25.00 you will have a library of resources that you can use over and over again.  The designers that have joined this sale are experts in their craft.  They have been sewing for a very long time and are well known in blogland and elsewhere.  Each designer has contributed one or two of their favorite patterns to create a bundle that is sure to please!  Whether you are sewing for your own family or making gifts for others, these are patterns that you will love to use. If you've never sewn with a PDF pattern before, let me tell you how great it is!  After downloading your pattern instructions and your pattern, you will print out the pattern itself, creating pattern tiles, if you will.  Simply tape the tiles together to create the full pattern!  At that point you can cut out the size that you need and pin the paper pattern directly to your fabric or you can trace the pattern size that you need onto sewing paper or tissue paper and cut it out, saving the paper pattern for later when you need to sew another size.  Pdf patterns are so convenient because you can print them out as many times as you need!
Click here to buy the bundle!
Now let me tell you a little bit about the giveaway!  
The Sew Fab Giveaway is amazing!  One lucky winner will win a bunch of amazing prizes from Craftsy, Fat Quarter Shop, fabricworm, Jennifer's Jewels Custom Labels on Etsy, Green Bee Patterns, author Deborah Moebes, Mee a Bee, Gussy Sews, I'm Feeling Crafty, and Ball and Chain on Etsy. See the end of the post for giveaway details.  This giveaway is not to be missed!

I know you're dying to know "What is included in the pattern bundle?"

18 well-loved ePatterns from 10 well-known designers are instantly accessible to you by PDF download upon purchase of the Sew Fab e-Pattern Bundle.  Here are the patterns that you will receive (click on the links below to see more details):
Goodship Dress by One Girl Circus, Mommy & Mia Apron by Sew Much AdoRuby Lou Doll by Sew Much AdoMini Maxi Dress by Seamingly SmittenMiss Mod Top by Seamingly SmittenLove Your Lunch Box by Ginger CakesModern Folksy Bunny by Ginger CakesBanyan Pants & Shorts by Figgy'sBanyan Top & Tunic by Figgy'sGo To Shift Dress by Go To PatternsGo To Gift Bags by Go To PatternsSidekick Suitcase by Sew FearlessMadeline Dress by Me Sew CrazyForget Me Knot Dress by Me Sew CrazyAlex & Anna Summer PJs by Peekaboo Pattern ShopAlex & Anna Winter PJs by Peekaboo Pattern ShopCommuter Cowl by luvinthemommyhoodScirocco Dress by Figgy's The Sew Fab e-Pattern Bundle is only available for one week and will never be available again!  You can purchase the bundle from February 4th at 8 a.m. EST through February 11th at 8 a.m. EST and there will be no late sales offered.  Due to the nature of the sale there will be no refunds offered.
You don't want to miss this unique opportunity to purchase a ready made collection of 18 PDF sewing patterns from 10 of the best designers out there!
Buy Now


And now for The Sew Fab Giveaway!

You are not going to believe the prizes included in this giveaway!  Can't buy the bundle?  It's okay... purchase is not required to enter.  Take a look at what you have the chance to win:
A Sewing Themed Box of Goodies from Pick Your Plum Fabulous Wristlet from Gussy Sews (not necessarily the one pictured) The latest release, Stitch Savvy, by Deborah Moebes Sterling Silver Sewing Machine necklace from Ball and Chain on Etsy $50 Gift Certificate to Fat Quarter Shop $50 Gift Certificate to fabricworm A free online class from Craftsy.com The Scoop Tote Pattern from Green Bee Patterns 60 Custom Tags from Jennifer's Jewels Red Riding Hood Little Girl's Satchel from Mee a Bee Handmade Sewing Machine Cover from I'm Feeling Crafty

YES, ONE WINNER WILL WIN ALL OF THOSE GOODIES!!!

There are lots of chances to win and no purchase required to enter the giveaway.  Just use the Rafflecopter widget and enter to win this amazing prize package that will inspire you in your sewing as well as keep you stocked with fabric for many projects to come!
a Rafflecopter giveaway

The Sew Fab e-Pattern Bundle Sale!

Sew Much Inspiration right at your finger tips...

only $24.95!

Get your bundle now!

Graphic design by Andrea Panell.